Empyrean Cloister Quest: Difference between revisions
imported>Atarax No edit summary |
imported>Arkalor m Text replace - " | Level Suggestions = | Item Rewards = " to " | Level Suggestions = | Contracts = | Item Rewards = " |
||
| (23 intermediate revisions by 5 users not shown) | |||
| Line 1: | Line 1: | ||
{{Quest Summary | |||
[[ | | Patch Introduced = [[The Child of Daralet]] | ||
| Related Quests = [[Sword of Lost Hope Quest]] | |||
| Updated = | |||
| | | | ||
| Live Image = | |||
| | | Live Image Caption = | ||
| | | Quest Type = Solo/Group | ||
| Kill Task = False | |||
| | | Start Location = [[Yaraq]] | ||
| | | Timer = 20 days (dagger, shirt, tool)<br>30 minutes (skull) | ||
| Level Restrictions = Lower: 15+<br>Upper: 21+ | |||
| Level Suggestions = | |||
| | | Contracts = | ||
| Item Rewards = [[Barbed Fletching Tool]]<br>[[Empyrean Scalemail Shirt]]<br>[[Obsidian Dagger]]<br>[[Skull of Avoren Palacost]] | |||
| Luminance Reward = | |||
| | | Max XP Reward = None | ||
| Titles = None | |||
| | | | ||
| | | Link Walk Through = True | ||
| Link Maps = True | |||
| | | Link Items = True | ||
| | | Link XP Rewards = False | ||
| Link Title Rewards = False | |||
| | | Link Images = True | ||
| | | Link Lore & Dialog = False | ||
| Link Notes = False | |||
| | }} | ||
| | == Quest Overview == | ||
This dungeon contains the first part of the [[Sword of Lost Hope Quest]] - the [[Skull of Avoren Palacost]]. | |||
== Walk Through == | |||
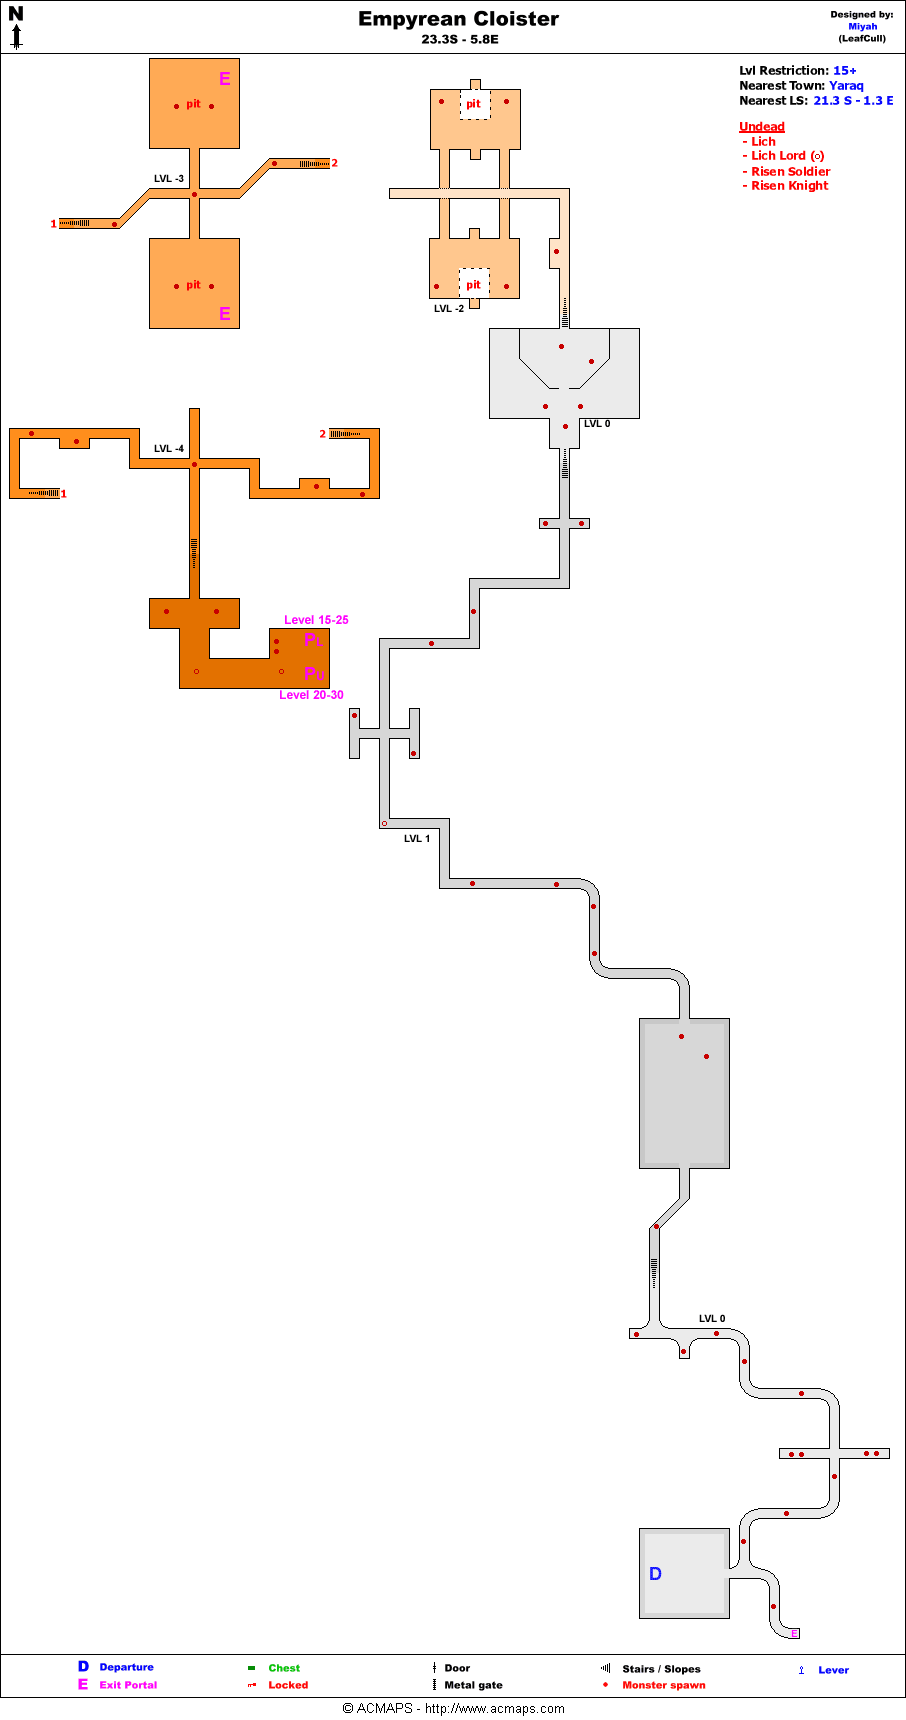
# From [[Yaraq]], enter the [[Empyrean Cloister]] at 23.4S, 5.8E. | |||
# Split your group into two teams. About half way into the dungeon one team will need to enter the [[Empyrean Cloister Upper]] and one the [[Empyrean Cloister Lower]]. | |||
#* Upper team members will receive the [[Skull of Avoren Palacost]]. | |||
#* Lower team members will receive a [[Barbed Fletching Tool]], [[Obsidian Dagger]], and an [[Empyrean Scalemail Shirt]]. | |||
# Each team, as they proceed through the Upper and Lower dungeons, needs to throw levers for the other team. So as levers are located by one team, they need to wait at the lever until the other team indicates that they are at their closed door. | |||
# As Acid Pits are encountered they must be jumped - make sure you have a high jump skill and that you are buffed! Also a good tip is to have an [[Aphus Lassel Portal Gem]] ready for use in case you do fall in. | |||
# In the final room in Lower is a torch that acts as the final lever for the Upper team. | |||
# The Skull spawns on the floor in Upper, the items in Lower are on the [[Mausoleum Guardian]]. | |||
TIP: This quest can easily be done "solo", provided you have 2 characters on your account that can survive the run. The lever-activated doors stay open for a minute or more; you can easily switch characters at each lever door, activate the lever using your other character and run it the next lever/door, then switch characters and proceed in the other dungeon in the same fashion. | |||
== Maps == | |||
{{Dungeon Table | |||
| Table Rows = | |||
{{Dungeon Maps | |||
| Dungeon = Empyrean Cloister | |||
| Coordinates = 23.4S, 5.8E | |||
| Wiki Map File = | |||
| ACmaps ID = 02AD | |||
| Other Site Name = | |||
| Other Site Link = | |||
}} | |||
{{Dungeon Maps | |||
| Dungeon = Lower Empyrean Mausoleum | |||
| Coordinates = Inside [[Empyrean Cloister]] | |||
| Wiki Map File = | |||
| ACmaps ID = 02AC | |||
| Other Site Name = | |||
| Other Site Link = | |||
}} | |||
{{Dungeon Maps | |||
| Dungeon = Upper Empyrean Mausoleum | |||
| Coordinates = Inside [[Empyrean Cloister]] | |||
| Wiki Map File = | |||
| ACmaps ID = 02AC | |||
| Other Site Name = | |||
| Other Site Link = | |||
}} | |||
}} | |||
== | == Items == | ||
= | {{Item Table|Caption=Quest Items | ||
| Asheron's Second Missive | |||
| Instructions (Sepulcher of the Hopeslayer) | |||
}} | |||
= | {{Item Table|Caption=Rewards from Upper | ||
| Skull of Avoren Palacost | |||
}} | |||
= | {{Item Table|Caption=Rewards from Lower | ||
| Barbed Fletching Tool | |||
| Empyrean Scalemail Shirt | |||
| Obsidian Dagger | |||
}} | |||
== Images == | == Images == | ||
Click image for full size version. | |||
<gallery widths=200px heights=200px perrow=3> | |||
File:Empyrean Cloister Live 4.jpg|The Mausoleum portals | |||
File:Upper Empyrean Mausoleum Live 2.jpg|Upper Mausoleum | |||
File:Upper Empyrean Mausoleum Live 3.jpg|Skull of Avoren Palacost | |||
</gallery> | |||
== Lore & Dialog == | == Lore & Dialog == | ||
<font color=darkgoldenrod>Chosen of Asheron tells you, "My lord conveys his gratitude for the efforts of your people. If you are one of the champions who took part in the defeat of Bael'Zharon, I can take your Soul Crystal Gem and give you a spellcasting staff to commemorate your achievement."<br> | |||
[[ | <font color=green>Chosen of Asheron gives you Asheron's Second Missive.</font><br> | ||
Chosen of Asheron tells you, "Also, I have instructions here that will lead you to the site of the Hopeslayer's defeat, should you wish to visit it."</font><br> | |||
<font color=green>Chosen of Asheron gives you Instructions.</font> | |||
---- | |||
'''Retired Text'''<br> | |||
<font color=darkgoldenrod>Chosen of Asheron tells you, "Greetings, Isparian. My lord Asheron requests the cooperation of your people. Take this."</font><br> | |||
<font color=green>Chosen of Asheron gives you Asheron's Missive.</font><br> | |||
<font color=darkgoldenrod>Chosen of Asheron tells you, "Assemble the artifacts and bring them to me, so that with my lord's help you may challenge and strike down the Hopeslayer."</font><br> | |||
---- | |||
* [[Asheron's Missive]] | |||
Latest revision as of 14:15, 23 March 2012
| Walk Through ___ Maps ___ Items ___ Images ___ |
| |||||||||||||||||||||||||||||||||||||||
Quest Overview
This dungeon contains the first part of the Sword of Lost Hope Quest - the Skull of Avoren Palacost.
Walk Through
- From Yaraq, enter the Empyrean Cloister at 23.4S, 5.8E.
- Split your group into two teams. About half way into the dungeon one team will need to enter the Empyrean Cloister Upper and one the Empyrean Cloister Lower.
- Upper team members will receive the Skull of Avoren Palacost.
- Lower team members will receive a Barbed Fletching Tool, Obsidian Dagger, and an Empyrean Scalemail Shirt.
- Each team, as they proceed through the Upper and Lower dungeons, needs to throw levers for the other team. So as levers are located by one team, they need to wait at the lever until the other team indicates that they are at their closed door.
- As Acid Pits are encountered they must be jumped - make sure you have a high jump skill and that you are buffed! Also a good tip is to have an Aphus Lassel Portal Gem ready for use in case you do fall in.
- In the final room in Lower is a torch that acts as the final lever for the Upper team.
- The Skull spawns on the floor in Upper, the items in Lower are on the Mausoleum Guardian.
TIP: This quest can easily be done "solo", provided you have 2 characters on your account that can survive the run. The lever-activated doors stay open for a minute or more; you can easily switch characters at each lever door, activate the lever using your other character and run it the next lever/door, then switch characters and proceed in the other dungeon in the same fashion.
Maps
| Dungeon | Coordinates | Wiki Map | ACmaps | Other | Quests |
| Empyrean Cloister | 23.4S, 5.8E | -- | 02AD | -- | -- |
| Lower Empyrean Mausoleum | Inside Empyrean Cloister | -- | 02AC | -- | -- |
| Upper Empyrean Mausoleum | Inside Empyrean Cloister | -- | 02AC | -- | -- |
Items
| Quest Items | ||||||||
|
|
Asheron's Second Missive |
|
Instructions (Sepulcher of the Hopeslayer) | |||||
| Rewards from Upper | ||||||||
|
|
Skull of Avoren Palacost | |||||||
| Rewards from Lower | ||||||||
|
|
Barbed Fletching Tool |
|
Empyrean Scalemail Shirt |
|
Obsidian Dagger | |||
Images
Click image for full size version.
-
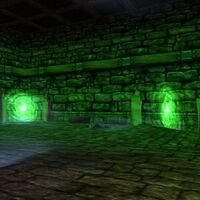 The Mausoleum portals
 -
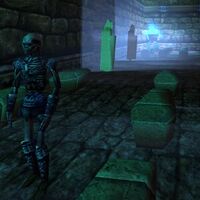 Upper Mausoleum
 -
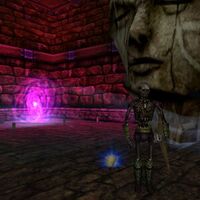 Skull of Avoren Palacost


Lore & Dialog
Chosen of Asheron tells you, "My lord conveys his gratitude for the efforts of your people. If you are one of the champions who took part in the defeat of Bael'Zharon, I can take your Soul Crystal Gem and give you a spellcasting staff to commemorate your achievement."
Chosen of Asheron gives you Asheron's Second Missive.
Chosen of Asheron tells you, "Also, I have instructions here that will lead you to the site of the Hopeslayer's defeat, should you wish to visit it."
Chosen of Asheron gives you Instructions.
Retired Text
Chosen of Asheron tells you, "Greetings, Isparian. My lord Asheron requests the cooperation of your people. Take this."
Chosen of Asheron gives you Asheron's Missive.
Chosen of Asheron tells you, "Assemble the artifacts and bring them to me, so that with my lord's help you may challenge and strike down the Hopeslayer."