Stone Tool Quest: Difference between revisions
imported>Arkalor mNo edit summary |
imported>Ricter |
||
| (18 intermediate revisions by 5 users not shown) | |||
| Line 8: | Line 8: | ||
| Kill Task = False | | Kill Task = False | ||
| Start Location = Samsur | | Start Location = Samsur | ||
| Timer = | | Timer = 20 hours | ||
| Level Restrictions = 1+ | | Level Restrictions = 1+ | ||
| Level Suggestions = | | Level Suggestions = 70+ | ||
| Contracts = | |||
| Item Rewards = [[Stone Tool]] | | Item Rewards = [[Stone Tool]] | ||
| Luminance Reward = None | |||
| MMD Reward = None | |||
| Max XP Reward = None | | Max XP Reward = None | ||
| Titles = | | Titles = | ||
| Line 18: | Line 21: | ||
| Link Maps = True | | Link Maps = True | ||
| Link Items = True | | Link Items = True | ||
| Link XP Rewards = | | Link XP Rewards = False | ||
| Link Title Rewards = False | | Link Title Rewards = False | ||
| Link Images = | | Link Images = True | ||
| Link Lore & Dialog = True | | Link Lore & Dialog = True | ||
| Link Notes = False | | Link Notes = False | ||
}} | }} | ||
== | == Quest Overview == | ||
The [[Stone Tool]] is used to remove [[Atlan Stone]]s from [[Atlan Weapons]] and [[Shadow Armor]]. | |||
== Walkthrough == | == Walkthrough == | ||
=== Getting to the Artifex Vault === | === Getting to the Artifex Vault === | ||
# The quest was updated in [[Heart of Woe]] when a second portal to the vault appeared at 24.5N 8.0E (see new rumor). | |||
# '''<font color=green>Optional:</font>''' Purchase the rumor: [[Duplicated Portals]] from certain [[:Special:Whatlinkshere/Duplicated Portals|shopkeepers]] to see the coordinates for the new portal. | |||
# To reach the duplicate portal take the [[Dovetail Valley Villas]] portal from [[Samsur]] at 0.8S, 18.9E. | |||
=== Inside the Vault === | === Inside the Vault === | ||
# From the drop, run down to the bottom of the slope where you will be met by four [[Tumerok Officer]]s and two ramps. | # From the drop, run down to the bottom of the slope where you will be met by four [[Tumerok Officer]]s and two ramps. | ||
# Take either of the ramps down and then take the west corridor. | # Take either of the ramps down and then take the west corridor. | ||
# Follow the corridor around and then take the ramp down. Ignore the lever activated doors to your left instead run west through the hall of crystals. | # Follow the corridor around and then take the ramp down. Ignore the lever activated doors to your left instead run west through the hall of crystals. | ||
# At the end is a room with another | # At the end is a room with another lever activated door and a lever which opens the doors back to the east. | ||
# Pull the level and run back through the hall and pull the lever that is now accessible - run back to the previous doors. | # Pull the level and run back through the hall and pull the lever that is now accessible - run back to the previous doors. | ||
# Continue on, ignore the first crossway instead going to the section ahead with the barrels. Notice the lever activated door a little to the west. | # Continue on, ignore the first crossway instead going to the section ahead with the barrels. Notice the lever activated door a little to the west. | ||
# From the barrels take a right going east. | # From the barrels take a right going east. | ||
# Take the first right into another room with blue crystals. Run to the doors at the end of the room and pull the lever. | # Take the first right into another room with blue crystals. Run to the doors at the end of the room and pull the lever. | ||
# '''<font color=green> | # '''<font color=green>Optional:</font>''' Alternatively, if you have the lockpick skill, go east at the first crossway and unlock the door (resistance: 402) to access the next lever. | ||
# Now run back to where the barrels are and go through the now open doors into another room of crystals. | # Now run back to where the barrels are and go through the now open doors into another room of crystals. | ||
# Run to end and jump down into the pit. Follow the corridor along to an large open chamber with huge barrel like platforms. | # Run to end and jump down into the pit. Follow the corridor along to an large open chamber with huge barrel like platforms. | ||
| Line 67: | Line 69: | ||
== Items == | == Items == | ||
{| | {{Item Table|Caption=Rewards | ||
| Stone Tool | |||
| | }} | ||
{{Item Table|Caption=Texts | |||
| | | Textbook (Atlan's Treatise) | ||
| | | Textbook (A Journal) | ||
| Atlan's Treatise | |||
| | | A Journal}} | ||
|} | |||
== Images == | == Images == | ||
| Line 84: | Line 85: | ||
Image:Stone Tool (Quest) Live 3.jpg|Misty Pit | Image:Stone Tool (Quest) Live 3.jpg|Misty Pit | ||
</gallery> | </gallery> | ||
== Lore & Dialog == | |||
'''Translating the various texts'''<br> | |||
<font color=green>You give Bretself the Translator Textbook.</font><br><font color=darkgoldenrod>Bretself the Translator tells you, "Do you realize what you have here? This appears to be nothing less than an Empyrean weapons manual! What a fabulous discovery! At long last, we have a glimpse into the lost arts of their great society."<br>Bretself the Translator tells you, "You certainly deserve a copy a this for yourself."</font><br><font color=green>Bretself the Translator gives you Atlan's Treatise.</font> | |||
---- | |||
<font color=green>You give Bretself the Translator Textbook.</font><br><font color=darkgoldenrod>Bretself the Translator tells you, "What beautiful craftsmanship... the blossoms in the paper are still fragrant. Empyrean magic was as subtle as it was powerful. This would seem to be a journal of some sort. A moment, I shall transcribe it into Roulean."</font><br><font color=green>Bretself the Translator gives you A Journal.</font> | |||
== Notes == | |||
* During the [[Heart of Woe]] event, a duplicate portal appeared to the [[Serac Vault]]. | |||
Latest revision as of 18:05, 3 June 2016
| Walk Through ___ Maps ___ Items ___ Images ___ Lore & Dialog ___ |
| |||||||||||||||||||||||||||||||||||||||
 | |||||||||||||||||||||||||||||||||||||||
Quest Overview
The Stone Tool is used to remove Atlan Stones from Atlan Weapons and Shadow Armor.
Walkthrough
Getting to the Artifex Vault
- The quest was updated in Heart of Woe when a second portal to the vault appeared at 24.5N 8.0E (see new rumor).
- Optional: Purchase the rumor: Duplicated Portals from certain shopkeepers to see the coordinates for the new portal.
- To reach the duplicate portal take the Dovetail Valley Villas portal from Samsur at 0.8S, 18.9E.
Inside the Vault
- From the drop, run down to the bottom of the slope where you will be met by four Tumerok Officers and two ramps.
- Take either of the ramps down and then take the west corridor.
- Follow the corridor around and then take the ramp down. Ignore the lever activated doors to your left instead run west through the hall of crystals.
- At the end is a room with another lever activated door and a lever which opens the doors back to the east.
- Pull the level and run back through the hall and pull the lever that is now accessible - run back to the previous doors.
- Continue on, ignore the first crossway instead going to the section ahead with the barrels. Notice the lever activated door a little to the west.
- From the barrels take a right going east.
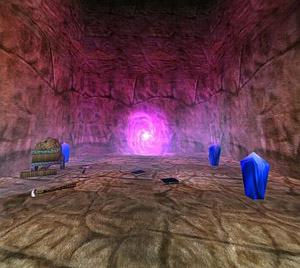
- Take the first right into another room with blue crystals. Run to the doors at the end of the room and pull the lever.
- Optional: Alternatively, if you have the lockpick skill, go east at the first crossway and unlock the door (resistance: 402) to access the next lever.
- Now run back to where the barrels are and go through the now open doors into another room of crystals.
- Run to end and jump down into the pit. Follow the corridor along to an large open chamber with huge barrel like platforms.
- Jump across the barrels to the east, taking extra care on the last platform (If you fall into the pit below a surface portal is the only exit).
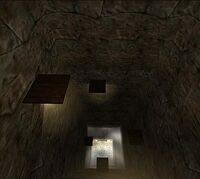
- Go east and you will come to a long mist filled pit with platforms on all sides. If you don't have the health or skill for the fall, carefully jump to each platform until you reach the bottom.
- At the bottom use the button on the west wall to open the metal doors to the final hallway.
- This next section has many side rooms each filled with blue crystals and Tumerok Gladiators. Run to the end ignoring the side rooms.
- At the end of the hallway go south through two sets of metal doors until you come to a lever room filled with more Gladiators. The pressure points on the floor here open doors releasing more Gladiators from above.
- Pull the lever in the northeast corner and run back to the hallway taking the middle south corridor - pull the final lever.
- Run back to the Gladiator room and through the doors with the portal. Just infront of the portal lies the Stone Tool and textbooks.
Maps
| Dungeon | Coordinates | Wiki Map | ACmaps | Other | Quests |
| Artifex Vault | -- | -- | 0137 | -- | -- |
Items
| Rewards | ||||||||
| Stone Tool | ||||||||
| Texts | ||||||||
| Textbook (Atlan's Treatise) | Textbook (A Journal) | Atlan's Treatise | A Journal | |||||
Images
-
Hall of Crystals
-
Barrel Platform Chamber
-
Misty Pit
Lore & Dialog
Translating the various texts
You give Bretself the Translator Textbook.
Bretself the Translator tells you, "Do you realize what you have here? This appears to be nothing less than an Empyrean weapons manual! What a fabulous discovery! At long last, we have a glimpse into the lost arts of their great society."
Bretself the Translator tells you, "You certainly deserve a copy a this for yourself."
Bretself the Translator gives you Atlan's Treatise.
You give Bretself the Translator Textbook.
Bretself the Translator tells you, "What beautiful craftsmanship... the blossoms in the paper are still fragrant. Empyrean magic was as subtle as it was powerful. This would seem to be a journal of some sort. A moment, I shall transcribe it into Roulean."
Bretself the Translator gives you A Journal.
Notes
- During the Heart of Woe event, a duplicate portal appeared to the Serac Vault.


