Secrets of Hizk Ri's Temple: Difference between revisions
Jump to navigation
Jump to search
imported>Tlosk No edit summary |
imported>Tlosk m Text replace - " Map available at ACMaps.com]" to "}}" |
||
| (14 intermediate revisions by 3 users not shown) | |||
| Line 1: | Line 1: | ||
Introduced | {{Dungeon Summary | ||
| Patch Introduced = [[On Bended Knee]] | |||
| Related Quests = [[Clutch of Kings]], [[Clutch of Kings (Keerik)]] | |||
| Updated = | |||
| | | | ||
| Live Image = Live.jpg | |||
| From [[King 4 Keerik Part 1]] | | Live Image Caption = | ||
| | | | ||
| Wiki Map File = | |||
| | | Wiki Map Two = | ||
| | | ACmaps.com ID = 0160 | ||
| Other Map = | |||
| [[ | | | ||
| | | Coordinates = 51.4S 67.9W (From [[King 4 Keerik Part 1]]) | ||
| Landblock = | |||
| | | Dereth Map = {{Map Point|51.4|S|67.9|W|Marker=Dungeon}} | ||
| | | Nearest Town = [[Ayan Baqur]] | ||
| | | Nearest LS = | ||
| Route = Take the [[Obsidian Rim Portal]] ([[Caul]] drop and [[Aerlinthe]] drop) then run southwest to 51.4S 67.9W. Jump down and speak to the [[Watcher of the Dead]]. | |||
| | |||
| Level Restrictions = 60+ | |||
| Tieable = False | |||
| Recallable = False | |||
| Summonable = False | |||
| Lifestone if Log = | |||
| Quest Flag = | |||
}} | |||
== General == | == General == | ||
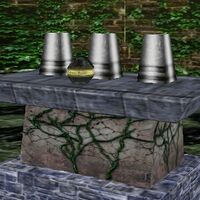
This is the Puzzle Part for the Burun King's Quest, Keerik.<br> | |||
# There are 4 Altars, each with 3 Cups on it, and 3 shells in front of it, in the room. | |||
# Pick one of the Altars, and change the camera angle so you look from above. | |||
# Click the Altar. A Ball will appear. The middle cup will cover the ball. | |||
# The Cups start moving. Pay attention where the one with the ball goes. | |||
# Pick the shell in front of the Altar which corresponds. | |||
# Give it to the Altar. | |||
# After you succeeded, you get a green message: <font color=green> You tilt the cup back enough for you to see that the ball is there!</font> | |||
# You can now use the portal, for which you are now flagged to use. | |||
# If you have made a mistake, you can reclick the Altar for another try. | |||
== Maps == | |||
* {{ACMaps.com|00FD}} | |||
* Wiki Map: | |||
:[[File:Name.png]] | |||
== | == Items and Objects == | ||
* {{Icon Link|Shell Table}} | |||
* {{Icon Link|Left Shell}} | |||
* {{Icon Link|Center Shell}} | |||
* {{Icon Link|Right Shell}} | |||
== Portals == | |||
* [[King 4 Keerik Part 3]] - See map. | |||
== Images == | |||
Click image for full size version. | |||
<gallery heights=200px widths=200px perrow=3> | |||
File:Shell Table Live.jpg|Shell Table | |||
File:Image.jpg|Caption | |||
</gallery> | |||
Latest revision as of 16:03, 22 November 2011
| Maps NPCs Creatures Items and Objects Portals Images Update History |
|
|||||||||||||||||||||||||||||||||||
General
This is the Puzzle Part for the Burun King's Quest, Keerik.
- There are 4 Altars, each with 3 Cups on it, and 3 shells in front of it, in the room.
- Pick one of the Altars, and change the camera angle so you look from above.
- Click the Altar. A Ball will appear. The middle cup will cover the ball.
- The Cups start moving. Pay attention where the one with the ball goes.
- Pick the shell in front of the Altar which corresponds.
- Give it to the Altar.
- After you succeeded, you get a green message: You tilt the cup back enough for you to see that the ball is there!
- You can now use the portal, for which you are now flagged to use.
- If you have made a mistake, you can reclick the Altar for another try.
Maps
- Map available at ACMaps.com
- Wiki Map:
Items and Objects
Portals
- King 4 Keerik Part 3 - See map.
Images
Click image for full size version.
-
Shell Table
-
Caption


