imported>Dread Lord Boba Fett |
|
| (44 intermediate revisions by 4 users not shown) |
| Line 1: |
Line 1: |
| Introduced in [[On Bended Knee]]. | | {{Dungeon Summary |
| | | Patch Introduced = [[On Bended Knee]] |
| | | Related Quests = [[Clutch of Kings (Reeshan)]] |
| | | Updated = |
| | | |
| | | Live Image = Live.jpg |
| | | Live Image Caption = |
| | | |
| | | Wiki Map File = |
| | | Wiki Map Two = |
| | | ACmaps.com ID = 00F5 |
| | | Other Map = |
| | | |
| | | Coordinates = 12.8S, 58.9W |
| | | Landblock = |
| | | Dereth Map = {{Map Point|12.8|S|58.9|W|Marker=Dungeon}} |
| | | Nearest Town = [[Fort Tethana]] |
| | | Nearest LS = |
| | | Route = via [[Izji Qo's Temple]] |
| | | |
| | | Level Restrictions = 60+ |
| | | Tieable = False |
| | | Recallable = False |
| | | Summonable = False |
| | | Lifestone if Log = |
| | | Quest Flag = |
| | }} |
| | == General == |
|
| |
|
| {|border=1 width=325 cellpadding=3 cellspacing=1
| | == Maps == |
| !colspan=2| Dungeon Summary
| | * {{ACMaps.com|00F5}} |
| |-
| | * Wiki Map: |
| !Location
| | :[[File:Name.png]] |
| | From [[King 1 Reeshan Part 3]]
| |
| |-
| |
| !Restrictions
| |
| | 60+
| |
| |-
| |
| !Related Quests
| |
| | [[Burun Kings]],<br>[[Burun King 1 Reeshan]]
| |
| |-
| |
| !Map
| |
| |[http://www.acmaps.com/map.php?id=00F5 ACmaps - King 1 Reeshan Part 4]
| |
| |-
| |
| | |
| |}
| |
| | |
| | |
| == Preparation ==
| |
| Before you get started killing [[Reeshan]], there are a few things you should do and share with your group.<br>
| |
| * Dissolve any fellowships because of the fellowship debuff spells that Reeshan casts.<br> | |
| * Do not cast any vulns or imperil on Reeshan because he will counter them, and become un-killable.<br>
| |
| * Be sure no one is using a [[Cast on Strike]] weapon, namely the [[Royal Runed Weapons]].
| |
| | |
| == Combat ==
| |
| Occasionally after dealing a great deal of damage to Reeshan (such as with critical hits) you will be teleported into his stomach. You will take a short fall and then land in the center of his stomach; which deals minor environmental acid damage, so you will want to get up against the stomach wall as soon as possible.
| |
| | |
| After you are against the wall, pull your [[Critical Strike]] weapon out and attack the [[Stomach Wall]] by doing the following:<br>
| |
| * Mages use walls, such as [[Tusker Fists]].<br>
| |
| * Archers attack with full speed as they do not have any missle defense to speak of.<br>
| |
| * Melees attack on full speed.
| |
| | |
| Since damage does not matter, it is best to just use whatever will allow you to attack the fastest. You will be portaled out eventually by critting him. Do not forget to switch back to your rend weapon, as fighting him using a Critical Strike weapon causes you to crit more, and therefore more likely to get eaten again.
| |
| | |
| == Getting Eaten ==
| |
| <font color=green>Reeshan rears back and opens his mouth wide. A hideous smell emits from within the behemoth's gullet and he thrusts himself forward scooping you into his mouth. Darkness envelopes you and you fall toward the beasts stomach.</font>
| |
| | |
| Occasionally after dealing a great deal of damage to Reeshan (such as with critical hits) you will be teleported into his stomach. You will take a short fall and then land in the center of his stomach; which deals minor environmental acid damage, so you will want to get up against the stomach wall as soon as possible.
| |
| | |
| After you are against the wall, pull your [[Critical Strike]] weapon out and attack the [[Stomach Wall]] by doing the following:<br>
| |
| * Mages use walls, such as [[Tusker Fists]].<br>
| |
| * Archers attack with full speed as they do not have any missle defense to speak of.<br>
| |
| * Melees attack on full speed.
| |
| | |
| Since damage does not matter, it is best to just use whatever will allow you to attack the fastest. You will be portaled out eventually by critting him. Do not forget to switch back to your rend weapon, as fighting him using a Critical Strike weapon causes you to crit more, and therefore more likely to get eaten again.
| |
| | |
| == Completion ==
| |
| After Reeshan has been killed, trophies of [[Reeshan's Hide]] will spawn on the ground throughout the final room. Everyone needs one and they can be turned in, in [[Cragstone]]. Check [[Burun_King_1_Reeshan| Burun King 1 Reeshan]] for more detailed information.
| |
|
| |
|
| == Creatures == | | == Creatures == |
| | {{Creature Class|Burun |
| | | Location = Dungeon |
| | | Burun Ruuk Lout |
| | | Burun Ruuk Seer |
| | | Guruk Boor |
| | | Guruk Crusher |
| | | Guruk Heavy |
| | | Guruk Miscreant |
| | | Reeshan |
| | }} |
|
| |
|
| '''[[:Category:Ruuk | Burun Ruuk]]'''
| | == Items and Objects == |
| * [[Burun Ruuk Lout]] | | * {{Icon Link|Reeshan's Hide}} - Found on the floor after the king dies. |
| * [[Burun Ruuk Seer]]
| |
| | |
| '''[[:Category:Guruk | Burun Guruk]]'''
| |
| * [[Guruk Boor]]
| |
| * [[Guruk Crusher]]
| |
| * [[Guruk Heavy]]
| |
| * [[Guruk Miscreant]]
| |
| | |
| '''[[:Category:Burun | Burun King]]''' | |
| * [[Reeshan]]
| |
| | |
|
| |
|
| [[Category:Location]]
| | == Images == |
| [[Category:Dungeon]]
| | Click image for full size version. |
| | <gallery heights=200px widths=200px perrow=3> |
| | File:Reeshan_Court_Live.jpg|Caption |
| | File:Image.jpg|Caption |
| | </gallery> |
General
Maps
- File:Name.png
Creatures
 Burun
Burun
Items and Objects
Images
Click image for full size version.


 Reeshan's Hide - Found on the floor after the king dies.
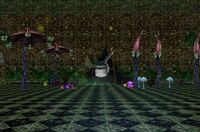 Caption
 Caption
