Rynthid Assessment: Difference between revisions
imported>Sucamarto |
imported>Zen1605 No edit summary |
||
| (51 intermediate revisions by 4 users not shown) | |||
| Line 15: | Line 15: | ||
| Contracts = | | Contracts = | ||
| Item Rewards = 3 use [[Legendary Key]] | | Item Rewards = 3 use [[Legendary Key]] | ||
| MMD Reward = 10 | |||
| Luminance Reward = 20,000 | | Luminance Reward = 20,000 | ||
| Max XP Reward = 350,000,000 | | Max XP Reward = 350,000,000 | ||
| Line 32: | Line 33: | ||
The [[Curator of Torment]] is looking to test Isparians through a series of 'tests'. | The [[Curator of Torment]] is looking to test Isparians through a series of 'tests'. | ||
4 tests must be completed in order to reach the rewards room. Each test is chosen randomly from the collection of possible tests. This quest will therefore vary each time it is completed. This also makes retrieving a corpse problematic, as there is no guarantee you can easily return to the same test. | |||
== Walk Through == | == Walk Through == | ||
# To begin this quest, talk to the [[Rynthid Assessment Crystal]] located at 62.3S, 66.2W. The [[Rynthid Assessment Crystal]] will portal you to the beginning of the tests. | # To begin this quest, talk to the [[Rynthid Assessment Crystal]] located at 62.3S, 66.2W. The [[Rynthid Assessment Crystal]] will portal you to the beginning of the tests. | ||
#* Route: Use [[Rynthid Recall]] or take the [[Dangerous Portal Device]] from a mansion to Center of the [[Obsidian Plains]] and run to the [[Rynthid Assessment Crystal]] located at 62.3S, 66.2W. | #* Route: Use [[Rynthid Recall]] or take the [[Dangerous Portal Device]] from a mansion to Center of the [[Obsidian Plains]] and run to the [[Rynthid Assessment Crystal]] located at 62.3S, 66.2W. | ||
# The first room contains a [[Rynthid Assessment Entry Portal|Portal]] to the first of the tests. This portal is randomly generated upon entry to the dungeon. The sequence of the tests is random. | # The first room contains a [[Rynthid Assessment Entry Portal|Portal]] to the first of the tests. This portal is randomly generated upon entry to the dungeon. The sequence of the tests is random. You must complete 4 tests to get to the rewards room. | ||
#* '''Important: Take note of the color of all portals you enter, starting with this one. The color of the portals will determine the color-coded levers at the end of the quest.''' | #* '''Important: Take note of the color of all portals you enter, starting with this one. The color of the portals will determine the color-coded levers at the end of the quest. There will be a total of 4 portals that you use. If you choose the wrong color, you will be portaled to the surface and have to start over.''' | ||
=== Mite Test === | === Mite Test === | ||
| Line 44: | Line 45: | ||
# Loot [[Key I]], [[Key II]], and [[Key III]] that will unlock the doors to the south. | # Loot [[Key I]], [[Key II]], and [[Key III]] that will unlock the doors to the south. | ||
# Take the colored portal to the next test. | # Take the colored portal to the next test. | ||
=== Grievver Test === | |||
# Kill the 3 [[Grievver Violator]]s to open the door to the next large room. | |||
# Repeat the process of killing the Grievvers until you reach the next colored portal. | |||
=== Wasp Test === | |||
# Run through the hallway directly ahead, which does acid damage if you stay in it too long. | |||
# Kill the 3 [[Swamp Phyntos Wasp]]s in the next room. They cast acid spells and use slashing attacks. | |||
# Repeat the first two steps several more times until you reach the portal at the end. | |||
=== Training Dummy Test === | === Training Dummy Test === | ||
# Move past the [[Training Dummy]]s that cast lightning spells across the room. | # Move past the [[Training Dummy]]s that cast lightning spells across the room. | ||
#* Beware! In the later rooms some of the dummies cast very large ring spells. It is best to identify these statues before running through the room. | |||
# Hug the right side of the wall until you reach the next colored portal. | # Hug the right side of the wall until you reach the next colored portal. | ||
=== Rock Jumping Test === | === Rock Jumping Test === | ||
# Jump up the many rocks until you reach the next colored portal at the top. | # Jump up the many rocks and then a few colored portal platforms until you reach the next colored portal at the top. | ||
#* Beware of lightning damage on the floor during this test! | #* Beware of lightning damage on the floor during this test! | ||
| Line 58: | Line 69: | ||
=== Moars Test === | === Moars Test === | ||
# Defeat a series of | # Defeat a series of spawns of [[Moar]]s. The moars hit with fire damage and spit acid damage. | ||
#* '''First Spawn''': Two [[Raging Moar]]s | #* '''First Spawn''': Two [[Raging Moar]]s | ||
#* '''Second Spawn''': Three [[Raging Moar]]s | #* '''Second Spawn''': Three [[Raging Moar]]s | ||
| Line 64: | Line 75: | ||
#* '''Fourth Spawn''': Three [[Raging Moar]]s | #* '''Fourth Spawn''': Three [[Raging Moar]]s | ||
#* '''Fifth Spawn''': Three [[Raging Moar]]s | #* '''Fifth Spawn''': Three [[Raging Moar]]s | ||
# The door will open to the east. Jump across the pit and take the next colored portal. | #The sequence might also be: | ||
#* '''First Spawn''': Two [[Raging Moar]]s | |||
#* '''Second Spawn''': Three [[Raging Moar]]s | |||
#* '''Third Spawn''': Three [[Enraged Moar]]s | |||
# The door will open to the east when you have killed all the spawns. Jump across the pit and take the next colored portal. | |||
::: <font color="green">A voice whispers in your head, "Well done. You may continue."</font> | ::: <font color="green">A voice whispers in your head, "Well done. You may continue."</font> | ||
=== Margul Test === | === Margul Test === | ||
# Defeat a series of three marguls. | # Defeat a series of three marguls. The first 2 cast lighting and imperil and use lightning spells. The third uses void magic. | ||
#* '''First Spawn''': | #* '''First Spawn''': [[Margul Roamer]] | ||
#* '''Second Spawn''': | #* '''Second Spawn''': [[Fierce Margul Roamer]] | ||
#* '''Third Spawn''': | #* '''Third Spawn''': [[Vicious Margul Roamer]] | ||
# A success message will be displayed and the door at the end of the hallway will open. | # A success message will be displayed and the door at the end of the hallway will open. | ||
# Jump across the short gap and proceed to take the next colored portal. | # Jump across the short gap and proceed to take the next colored portal. | ||
| Line 78: | Line 93: | ||
# Proceed through a series of rooms with [[Gurog Bruiser]]s to reach the next colored portal at the end. | # Proceed through a series of rooms with [[Gurog Bruiser]]s to reach the next colored portal at the end. | ||
#* Each room has a maze of horizontal portals which appear and disappear. These portals will drop you back at the start of this test. Avoid them as you move through each room. | #* Each room has a maze of horizontal portals which appear and disappear. These portals will drop you back at the start of this test. Avoid them as you move through each room. | ||
=== Remoran Test === | |||
# Defeat a series of three remorans. '''They counter buff vulnerabilities.''' | |||
#* '''First Spawn''': [[Remoran Sapper]] | |||
#* '''Second Spawn''': [[Fierce Remoran Sapper]] | |||
#* '''Third Spawn''': [[Vicious Remoran Sapper]] | |||
# A success message will be displayed and the door at the end of the hallway will open. | |||
# Jump across the short gap and proceed to take the next colored portal. | |||
=== Drudge Test === | |||
# | |||
# | |||
# | |||
# | |||
=== Assessment Chamber === | === Assessment Chamber === | ||
# Now you will be required to use the colored levers that correspond with each colored portal. Pull the levers in order: | # Now you will be required to use the colored levers that correspond with each colored portal you used. Pull the levers in order: | ||
#* <font color="green">Correct.</font> | #* <font color="green">Correct.</font> | ||
#* <font color="green">Correct.</font> | #* <font color="green">Correct.</font> | ||
| Line 92: | Line 123: | ||
| Table Rows = | | Table Rows = | ||
{{Dungeon Maps | {{Dungeon Maps | ||
| Dungeon = | | Dungeon = Rynthid Assessment Dungeon | ||
| Coordinates = | | Coordinates = | ||
| Wiki Map File = | | Wiki Map File = | ||
| Line 107: | Line 138: | ||
== Experience Rewards == | == Experience Rewards == | ||
{{Quest Experience Table | {{Quest Experience Table | ||
| Repeat Differs = False | | Repeat Differs = False | ||
| Table Rows = | | Table Rows = | ||
{{Quest Task | {{Quest Task | ||
| Description = | | Description = Complete the tests successfully | ||
| Max XP = | | Max XP = 350,000,000 | ||
| Percent of Level = | | Percent of Level = | ||
| Level Cap = | | Level Cap = | ||
| Line 137: | Line 154: | ||
{{Title | {{Title | ||
| Title = [[Well Trained]] | | Title = [[Well Trained]] | ||
| Task = | | Task = Complete the tests successfully | ||
}} | }} | ||
}} | }} | ||
| Line 144: | Line 161: | ||
Click image for full size version. | Click image for full size version. | ||
<gallery widths=200px heights=200px perrow=3> | <gallery widths=200px heights=200px perrow=3> | ||
File:Rynthid_Assessment_Entry_Portal_Live.jpg|[[Rynthid | File:Rynthid_Assessment_Entry_Portal_Live.jpg|[[Rynthid Assessment Entry Portal]] | ||
File:Locked Doors (Mite Test) Live.png|Locked Doors (Mite Test) | File:Locked Doors (Mite Test) Live.png|Locked Doors (Mite Test) | ||
File:Training Dummy Room Live.png|Training Dummy Room | File:Training Dummy Room Live.png|Training Dummy Room | ||
| Line 164: | Line 181: | ||
== Notes == | == Notes == | ||
* ?? | * ?? | ||
[[Category:Jumping Puzzle]] | |||
Latest revision as of 04:34, 5 September 2016
| Walk Through ___ Maps ___ Items ___ XP ___ Images ___ Lore & Dialog ___ |
| |||||||||||||||||||||||||||||||||||||||
Quest Overview
The Curator of Torment is looking to test Isparians through a series of 'tests'.
4 tests must be completed in order to reach the rewards room. Each test is chosen randomly from the collection of possible tests. This quest will therefore vary each time it is completed. This also makes retrieving a corpse problematic, as there is no guarantee you can easily return to the same test.
Walk Through
- To begin this quest, talk to the Rynthid Assessment Crystal located at 62.3S, 66.2W. The Rynthid Assessment Crystal will portal you to the beginning of the tests.
- Route: Use Rynthid Recall or take the Dangerous Portal Device from a mansion to Center of the Obsidian Plains and run to the Rynthid Assessment Crystal located at 62.3S, 66.2W.
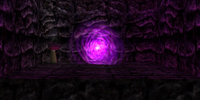
- The first room contains a Portal to the first of the tests. This portal is randomly generated upon entry to the dungeon. The sequence of the tests is random. You must complete 4 tests to get to the rewards room.
- Important: Take note of the color of all portals you enter, starting with this one. The color of the portals will determine the color-coded levers at the end of the quest. There will be a total of 4 portals that you use. If you choose the wrong color, you will be portaled to the surface and have to start over.
Mite Test
- Kill the Troublesome Mites to the north, west, and east. All Troublesome Mites are accompanied by three Fiesty Mites.
- Loot Key I, Key II, and Key III that will unlock the doors to the south.
- Take the colored portal to the next test.
Grievver Test
- Kill the 3 Grievver Violators to open the door to the next large room.
- Repeat the process of killing the Grievvers until you reach the next colored portal.
Wasp Test
- Run through the hallway directly ahead, which does acid damage if you stay in it too long.
- Kill the 3 Swamp Phyntos Wasps in the next room. They cast acid spells and use slashing attacks.
- Repeat the first two steps several more times until you reach the portal at the end.
Training Dummy Test
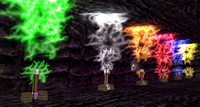
- Move past the Training Dummys that cast lightning spells across the room.
- Beware! In the later rooms some of the dummies cast very large ring spells. It is best to identify these statues before running through the room.
- Hug the right side of the wall until you reach the next colored portal.
Rock Jumping Test
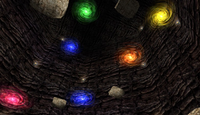
- Jump up the many rocks and then a few colored portal platforms until you reach the next colored portal at the top.
- Beware of lightning damage on the floor during this test!
Portal Jumping Test
- Jump up the multi-colored portal platforms using shift jumps.
- Take the portal at the top of the chamber.
Moars Test
- Defeat a series of spawns of Moars. The moars hit with fire damage and spit acid damage.
- First Spawn: Two Raging Moars
- Second Spawn: Three Raging Moars
- Third Spawn: One Enraging Moar
- Fourth Spawn: Three Raging Moars
- Fifth Spawn: Three Raging Moars
- The sequence might also be:
- First Spawn: Two Raging Moars
- Second Spawn: Three Raging Moars
- Third Spawn: Three Enraged Moars
- The door will open to the east when you have killed all the spawns. Jump across the pit and take the next colored portal.
- A voice whispers in your head, "Well done. You may continue."
Margul Test
- Defeat a series of three marguls. The first 2 cast lighting and imperil and use lightning spells. The third uses void magic.
- First Spawn: Margul Roamer
- Second Spawn: Fierce Margul Roamer
- Third Spawn: Vicious Margul Roamer
- A success message will be displayed and the door at the end of the hallway will open.
- Jump across the short gap and proceed to take the next colored portal.
Gurog Test
- Proceed through a series of rooms with Gurog Bruisers to reach the next colored portal at the end.
- Each room has a maze of horizontal portals which appear and disappear. These portals will drop you back at the start of this test. Avoid them as you move through each room.
Remoran Test
- Defeat a series of three remorans. They counter buff vulnerabilities.
- First Spawn: Remoran Sapper
- Second Spawn: Fierce Remoran Sapper
- Third Spawn: Vicious Remoran Sapper
- A success message will be displayed and the door at the end of the hallway will open.
- Jump across the short gap and proceed to take the next colored portal.
Drudge Test
Assessment Chamber
- Now you will be required to use the colored levers that correspond with each colored portal you used. Pull the levers in order:
- Correct.
- Correct.
- Correct.
- Correct.
- Correct. Consult the Rynthid Assessment Crystal.
- Speak with the Rynthid Assessment Crystal for rewards.
Maps
| Dungeon | Coordinates | Wiki Map | ACmaps | Other | Quests |
| Rynthid Assessment Dungeon | -- | -- | -- | -- | -- |
Items
| Quest Items | ||||||||
| Key I | Key II | Key III | ||||||
| Rewards | ||||||||
| Legendary Key | ||||||||
Experience Rewards
| Task Required | Max Experience | Percentage & Level Cap | |||
| Complete the tests successfully | 350,000,000xp |
??% up to level ?? | |||
|
| |||||
| See Level Costs for per level information. | |||||
Title Rewards
| Task Required | Title Reward |
| Complete the tests successfully | Well Trained |
|
| |
| See Titles for a list of all available titles. | |
Images
Click image for full size version.
-
Locked Doors (Mite Test)
-
Training Dummy Room
-
Jumping Test
-
Assessment Chamber Portal
-
Assessment Chamber Levers
Lore & Dialog
Rynthid Assessment Crystal tells you,"Subject qualifications met. Configuring facility for experiment."
Rynthid Assessment Crystal tells you,"Facility initialized. Prepare for subject analysis to commence."
Rynthid Assessment Crystal tells you,"CAUTION: Removal by death may result in the inability to return to the exact sequence."
Rynthid Assessment Crystal tells you,"All unclaimed valuables left in the facility become property of the Curator of Torment"
Rynthid Assessment Crystal tells you,"NOTE: Observation and recollection skills will be tested as the final portion of the test experience."
Rynthid Assessment Crystal tells you,"Failure will not be tolerated. Discipline will be administered with extreme prejudice."
Rynthid Assessment Crystal tells you, "Unauthorized access detected. Removal from facility commencing."
Notes
- ??


