Rynthid Tentacle Weapons: Difference between revisions
imported>OlorintheIstari No edit summary |
imported>Dakmor-Kavu |
||
| (11 intermediate revisions by 4 users not shown) | |||
| Line 1: | Line 1: | ||
{{Quest Summary | {{Quest Summary | ||
| Patch Introduced = [[Shattered Masks]] | | Patch Introduced = [[Shattered Masks]] | ||
| Related Quests = | | Related Quests = [[Paragon Weapons]] | ||
| Updated = [[Fowl Play]] | | Updated = [[Fowl Play]], [[Spring 2014]] | ||
| | | | ||
| Live Image = Live.jpg | | Live Image = Live.jpg | ||
| Line 81: | Line 81: | ||
#* The Inner Sanctum portal is a portal to return to the final fight should you die. This only applies if the crystals are all still dead and you can get back into the Catacombs. | #* The Inner Sanctum portal is a portal to return to the final fight should you die. This only applies if the crystals are all still dead and you can get back into the Catacombs. | ||
# Inside the catacombs you will enter in a large room. Make your way through it exiting west. | # Inside the catacombs you will enter in a large room. Make your way through it exiting west. | ||
# Take the first right turn (heading north) and at the next split turn right (north) and at the next split head north once more. | # Take the first right turn (heading north down the ramp) and at the next split turn right (north) and at the next split head north once more. | ||
# As you come to the next split take a right (west) and eventually you will come to a large room. | # As you come to the next split take a right (west) and eventually you will come to a large room. | ||
# Proceed through the room heading south west, and exit to the west (taking the left of the 2 exits). | # Proceed through the room heading south west, and exit to the west (taking the left of the 2 exits). | ||
| Line 101: | Line 101: | ||
:::<font color=green><player name> strikes down one of the Guardians! as the Guardian dies, it releases a Summoning Crystal into the room."</font> | :::<font color=green><player name> strikes down one of the Guardians! as the Guardian dies, it releases a Summoning Crystal into the room."</font> | ||
:::<font color=green>A voice echos in your mind, "You've survived my guards and defeated my lieutenants... Very well. I will deal with you myself."</font> | :::<font color=green>A voice echos in your mind, "You've survived my guards and defeated my lieutenants... Very well. I will deal with you myself."</font> | ||
# Summoning Crystals spawn monsters until they are destroyed. Killing them will make the fight easier for the group. | # Summoning Crystals spawn monsters until they are destroyed. Killing them will make the fight easier for the group. When the summoning crystals are all destroyed, the [[Curator of Torment (Rynthid Tentacle Weapons)|Curator of Torment]] makes his appearance. | ||
# When the [[Curator of Torment (Rynthid Tentacle Weapons)|Curator of Torment]] dies, a green global message appears, and he can be looted for a [[Shard of the Curator of Torment's Mask]] - he drops 20 of them. If needed, he will respawn in NPC-form just a few minutes after his death. | # When the [[Curator of Torment (Rynthid Tentacle Weapons)|Curator of Torment]] dies, a green global message appears, and he can be looted for a [[Shard of the Curator of Torment's Mask]] - he drops 20 of them. If needed, he will respawn in NPC-form just a few minutes after his death. | ||
::: <font color=green>Deep in the Catacombs of Torment, <player name> has struck down the Curator of Torment, forcing him again for a time into his prison in the abyss of Portalspace. | ::: <font color=green>Deep in the Catacombs of Torment, <player name> has struck down the Curator of Torment, forcing him again for a time into his prison in the abyss of Portalspace. | ||
| Line 164: | Line 164: | ||
| Description = Give [[Morgethais]] a [[Shard of the Curator of Torment's Mask]] | | Description = Give [[Morgethais]] a [[Shard of the Curator of Torment's Mask]] | ||
| Max XP = 718,000,000 | | Max XP = 718,000,000 | ||
| Percent of Level = | | Percent of Level = 50 | ||
| Level Cap = | | Level Cap = 220 | ||
}} | }} | ||
}} | }} | ||
| Line 197: | Line 197: | ||
:The portal in the alcove splits in two, revealing a passage beyond.</font> | :The portal in the alcove splits in two, revealing a passage beyond.</font> | ||
== Notes == | |||
* As part for the [[Spring 2014]] update give the [[Shard of the Curator of Torment's Mask]] to [[Summercrown]] to acquire the [[Luminous Amber of the 32nd Tier Paragon]]. | |||
Latest revision as of 21:41, 24 December 2014
| Walk Through ___ Maps ___ Items ___ XP ___ Images ___ Lore & Dialog ___ |
| |||||||||||||||||||||||||||||||||||||||
Quest Overview
Assist Morgethais in defeating the Curator of Torment. This quest involves visiting most of the Rynthid Infested Plains. A small group can do the first part of the quest and then the rest of the group can join.
This quest effectively ended the Curator of Torment storyline which ran from March - October of 2013.
Walk Through
- Optional: Talk to Morgethais (61.6S, 63.3W) located at the Encampment near Rynthid Infested Plains.
Part 1: Destroying the 4 Crystals
- Morgethais will ask you to assist him in destroying 4 Sanctum Warding Crystals located throughout the Rynthid Infested Plains. These crystals must be destroyed to spawn the portal to the Catacombs of Torment (62.31S, 65.52W).
- When all 4 crystals have been destroyed within the same hour, a global will appear letting players know that the final dungeon is now open.
- It does not matter in what order you kill the crystals. Players can split up and destroy them separately to save time.
- Each crystal takes 1 hour to respawn.
- As soon as even 1 of the crystals respawns, the portal to the Catacombs of Opposition will close.
- Beware! If the landblock the crystals are in resets, the crystals will respawn! It is recommended to keep a character in the outside landblock while the quest is being run.
- Of the 4 crystals, 2 can only be reached by going up the platforms, and the other 2 can be reached from the ground.
Platform Crystal #1: Platforms of Torment
- Make your way to the access ramp at 62.5S, 65.4W to begin climbing the platforms.
- To get to the first dungeon, head up the ramp. Make a full power jump across to the southern platform, then take the west ramp. Head north to the T intersection, and turn west and head into the Path of Torment portal.
- WARNING: the dungeon drop is HOT!
- Inside, head west and exit the room, then turn south. At the next split, head south.
- Continue west (from/past the southern hallway leading to the crystal) until you come to a large room. In here, head northeast and take the far east exit, then bear south all the way to the Platforms of Torment portal.
- Note: The portal drops outside on the next higher series of platforms (Platforms of Torment).
- The Sanctum Warding Crystal can be found not far from the drop at 62.0S 65.9W). It is on the very large platform directly ahead.
Platform Crystal #2: Platforms of Rage
- From the first platform crystal, head south and down the ramp. Take the next ramp heading east and up into the Path of Rage portal.
- In the dungeon you will come to a large room. Take the first exit on the right bearing west.
- After exiting the large room (or talking to the crystal) head east, then take the right bearing south. When you come to a 4 way split, head east until you come to a large room. In here, take the first left heading east. At the next split, head east and continue to the Platforms of Rage portal.
- WARNING: The drop is VERY hot!!
- On the platforms, the crystal can be found by following the ramps down from the drop location (63.1S, 66.7W).
- If you are with a small group, it is easier to just run directly to the crystal instead of fighting the many mobs on the large platform.
- At the path split, it does not matter if you go left or right, both paths meet up at the crystal.
Ground Crystal #1: Ground Level
- This crystal is located at 62.77S, 65.98W on the ground.
- Note: The crystal is not far from the portals for the Seed of Power quest and the inner Obsidian Plains. If necessary, re-group there before moving in to attack the crystal.
Ground Crystal #2: Platforms of Sorrow
- This crystal is located on the Platforms of Sorrow, but can be reached by jumping to the platforms from a cliff on the ground.
- From the first ground crystal, head up the nearby cliff and do a full power jump to the two nearby platforms.
- Note: You will need to have high jump skill in order to make the jump. Mages will have difficulty without a jump cantrip.
- You will land on two platforms which are connected by a single ramp. The platform with the crystal is just below. Jump down to it and destroy the crystal.
When all 4 crystals have been destroyed, a green global message will appear letting players know that the wards have been dropped, and the portal to the Catacombs of Torment (62.31S, 65.52W) has appeared. The portal is located in the center of the Rynthid Infested Plains area on the ground.
Part 2: The Catacombs of Torment
- When you enter there will be a surface portal behind you, and a portal to the Inner Sanctum on your right.
- WARNING: Accidentally going through the surface portal may cause you to be locked out should one of the crystals respawn.
- The Inner Sanctum portal is a portal to return to the final fight should you die. This only applies if the crystals are all still dead and you can get back into the Catacombs.
- Inside the catacombs you will enter in a large room. Make your way through it exiting west.
- Take the first right turn (heading north down the ramp) and at the next split turn right (north) and at the next split head north once more.
- As you come to the next split take a right (west) and eventually you will come to a large room.
- Proceed through the room heading south west, and exit to the west (taking the left of the 2 exits).
- Head around and down the ramp and continue following the hall. Take the second hallway that you come to on your right (heading north).
- At the next split, stay left (north east) until you come to another large room.
- Head through the room heading south east, and eventually exiting to the east.
- Follow the hall once again through a series of small looping corridors. Ignore the 2 hallways leading to the left, and instead turn right heading west.
- Take the first turn on your left (heading south), followed by an immediate right (heading west), followed by an immediate left (heading south).
- Down the hall you will find a room with a Lothus Slayer, a Lothus Archmage, and a portal to the Inner Sanctum.
- Note: The drop of the Inner Sanctum is safe.
Part 3: The Inner Sanctum
- Upon entering, the players will see the Curator of Torment NPC standing in the middle of the room. The room is completely safe for rebuffing until someone talks to him to trigger the final fight.
- After talking to the Curator, there will be a series of waves of enemies, which culminates in a showdown with the Curator itself. The first 2 waves of enemies are timed fights and last exactly 5 minutes total. It is possible to use a wall strategy in the far hallway to minimize the difficulty of the battle for smaller groups.
- A voice echos in your mind, "So, you've worked so hard to find me. You've interrupted my experiments and you've interfered with my plans. I cannot let you continue to exist, but I'm still not convinced you're worth my time. Guards! Remove this vermin from my sanctum. Their presence pollutes this place."
- In the first spawn players will fight Suppression Rifts - level 250, Containment Dolls - level 200, Lothus Servants - level 240, and Marionette Knight of Torments - level 220.
- In the second spawn, players will face Rynthid Minions, Rynthid Minion of Rages, Rynthid Slayers, Lothus Slayers - level 240, Lothus Servants, Marionette Knight of Torments, Ravaging Rynthid Sorcerers, and Lothus Archmages - level 300.
- After 5 minutes, any remaining enemies will despawn and 4 Lothus Guardian of Torments will appear. As each one is killed a small message will appear about the guardians dropping a Sanctum Summoning Crystal. Destroy each crystal as it appears. Once all the Lothus Guardian of Torment are killed, the Curator of Torment will spawn.
- <player name> strikes down one of the Guardians! as the Guardian dies, it releases a Summoning Crystal into the room."
- A voice echos in your mind, "You've survived my guards and defeated my lieutenants... Very well. I will deal with you myself."
- Summoning Crystals spawn monsters until they are destroyed. Killing them will make the fight easier for the group. When the summoning crystals are all destroyed, the Curator of Torment makes his appearance.
- When the Curator of Torment dies, a green global message appears, and he can be looted for a Shard of the Curator of Torment's Mask - he drops 20 of them. If needed, he will respawn in NPC-form just a few minutes after his death.
- Deep in the Catacombs of Torment, <player name> has struck down the Curator of Torment, forcing him again for a time into his prison in the abyss of Portalspace.
- The portal in the alcove splits in two, revealing a passage beyond.
Part 4: Rewards!
- After collecting a shard, head north. The portal door that was blocking the path will now be open. Simply jump across the lava to the platform on the other side to collect your rewards.
- Should you miss the jump do not worry. The pit is not very dangerous and easy to escape using a shift jump.
- On the ground players will find the Rynthid Tentacle weapons, along with a 5 use Legendary Key.
- Rynthid Tentacle Bow (Missile weapons)
- Rynthid Tentacle Dagger (Finesse weapons)
- Rynthid Tentacle Greatspear (Two-handed combat)
- Rynthid Tentacle Mace (Light weapons)
- Rynthid Tentacle Spear (Heavy weapons)
- Rynthid Tentacle Wand (War magic)
- Life-attuned Rynthid Tentacle Wand (Life magic)
- Nether-attuned Rynthid Tentacle Wand (Void magic)
- Once players have looted a weapon and use their Legendary Keys, head back to Morgethais (61.6S, 63.3W) at the Encampment near Rynthid Infested Plains for 718,000,000 XP, and 90,000 Luminance XP.
Maps
| Dungeon | Coordinates | Wiki Map | ACmaps | Other | Quests |
| Catacombs of Torment | 62.31S, 65.52W | -- | -- | -- | -- |
| Inner Sanctum | -- | -- | -- | -- | -- |
Items
| Quest Items | ||||||||
| Shard of the Curator of Torment's Mask | ||||||||
Experience Rewards
| Task Required | Max Experience | Percentage & Level Cap | |||
| Give Morgethais a Shard of the Curator of Torment's Mask | 718,000,000xp |
50% up to level 220 | |||
|
| |||||
| See Level Costs for per level information. | |||||
Images
Click image for full size version.
-
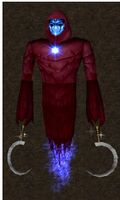
Curator of Torment
Quest Video
Rynthid Tentacle Weapons quest video by ImmortalBob
<youtube>ZCRyBzpUIVA</youtube>
Lore & Dialog
Talking to the NPC-form of the Curator of Torment
- A voice echos in your mind, "So, you've worked so hard to find me. You've interrupted my experiments and you've interfered with my plans. I cannot let you continue to exist, but I'm still not convinced you're worth my time. Guards! Remove this vermin from my sanctum. Their presence pollutes this place."
Spawn with 4 Lothus Guardian of Torments
- A voice echos in your mind, "Miserable failures! Can you not do something so simple as remove a few pathetic meat-bags?! Guardians! Succeed where the guards have failed, or face my wrath for your failure."
- <player name> strikes down one of the Guardians! as the Guardian dies, it releases a Summoning Crystal into the room."
The Curator of Torment appears
- A voice echos in your mind, "You've survived my guards and defeated my lieutenants... Very well. I will deal with you myself."
Global message when the Curator of Torment dies.
- Deep in the Catacombs of Torment, <player name> has struck down the Curator of Torment, forcing him again for a time into his prison in the abyss of Portalspace.
- The portal in the alcove splits in two, revealing a passage beyond.
Notes
- As part for the Spring 2014 update give the Shard of the Curator of Torment's Mask to Summercrown to acquire the Luminous Amber of the 32nd Tier Paragon.


