Spawn Distributions: Difference between revisions
imported>Arkalor |
imported>Arkalor No edit summary |
||
| Line 16: | Line 16: | ||
==== [[Middle Osteth]] ==== | ==== [[Middle Osteth]] ==== | ||
===== Level 1-10 (Starter Areas) ===== | ===== Level 1-10 (Starter Areas) ===== | ||
====== Aluvian Regions ====== | |||
* [[Holtburg]] | * [[Holtburg]] | ||
====== Sho Regions ====== | |||
* [[Shoushi]] | * [[Shoushi]] | ||
* [[Greenmire Swamp]] | |||
====== Gharu'ndim Regions ====== | |||
* [[Yaraq]] | * [[Yaraq]] | ||
* [[Yaraq Cove]] | |||
===== Level 1-20 (Newbie Areas) ===== | |||
* [[River Prosper]] | |||
** [[Isle of Tears]] | |||
** [[Blackmire Swamp]] (Northwest) | |||
===== Level 20-40 ===== | ===== Level 20-40 ===== | ||
* [[Blackmire Swamp]] | * [[Blackmire Swamp]] (East) | ||
* [[Snowflake Mountain Range]] | * [[Snowflake Mountain Range]] | ||
| Line 96: | Line 107: | ||
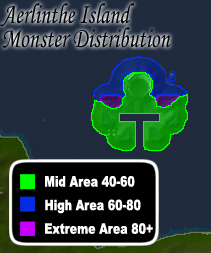
[[File:Aerlinthe Spawn Distribution.jpg|thumb|211px|right|Aerlinthe Spawn Distribution Map]] | [[File:Aerlinthe Spawn Distribution.jpg|thumb|211px|right|Aerlinthe Spawn Distribution Map]] | ||
* [[#top|Back to top]] | * [[#top|Back to top]] | ||
=== [[Aerlinthe|Aerlinthe Island]] === | |||
===== Level 40-60 ===== | ===== Level 40-60 ===== | ||
| Line 110: | Line 121: | ||
* [[Aurlanaa's Aerie]] | * [[Aurlanaa's Aerie]] | ||
<br> | <br> | ||
=== [[Aphus Lassel]] === | |||
---- | ---- | ||
* [[#top|Back to top]] | * [[#top|Back to top]] | ||
| Line 120: | Line 131: | ||
* [[Aphus Lassel#Extreme Island|Extreme Island]] | * [[Aphus Lassel#Extreme Island|Extreme Island]] | ||
<br> | <br> | ||
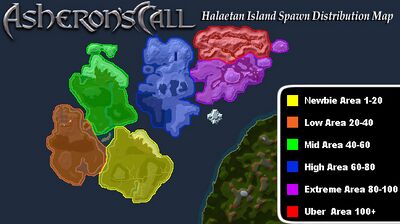
=== [[Halaetan Isles]] === | |||
---- | ---- | ||
[[File:Halaetan Spawn Distribution.jpg|thumb|400px|right|Halaetan Isles Spawn Distribution Map]] | [[File:Halaetan Spawn Distribution.jpg|thumb|400px|right|Halaetan Isles Spawn Distribution Map]] | ||
| Line 142: | Line 153: | ||
===== Level 100+ ===== | ===== Level 100+ ===== | ||
* [[Plains of Ruin|Isle of Ruin]] (Shattered Outlands) | * [[Plains of Ruin|Isle of Ruin]] (Shattered Outlands) | ||
<br> | <br> | ||
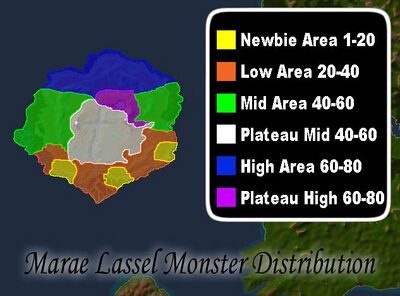
=== [[Marae Lassel]] === | === [[Marae Lassel]] === | ||
---- | ---- | ||
| Line 170: | Line 177: | ||
=== [[Singularity Caul]] === | === [[Singularity Caul]] === | ||
---- | ---- | ||
* [[North Singularity Caul]] | * [[North Singularity Caul]] | ||
* [[West Singularity Caul]] | * [[West Singularity Caul]] | ||
| Line 188: | Line 194: | ||
* [[Xi Ru's Island]] | * [[Xi Ru's Island]] | ||
* [[Freebooter Isle]] | * [[Freebooter Isle]] | ||
=== [[Vissidal | == High Level Islands (130+) == | ||
* [[Vissidal]] (130+) | |||
* [[Dark Isle]] (150+ | |||
== Offworld == | |||
=== [[Bur|Bur Homeworld]] === | === [[Bur|Bur Homeworld]] === | ||
* [[Kor-Gursha]] | * [[Kor-Gursha]] | ||
== Other == | |||
* [[Asheron's Island]] | |||
* [[ | |||
* [[Inner Sea]] | * [[Inner Sea]] | ||
* [[ | * [[Olthoi Island]] | ||
* [[Ulgrim's Island]] | * [[Ulgrim's Island]] | ||
Revision as of 14:06, 26 March 2012
Related topics: Category:Geographic Area, Maps
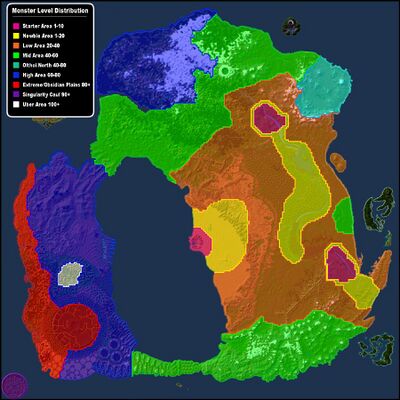
Developer's Notes on Spawn Distributions
"The Ranges noted on the Monster Distribution Maps do not mean that the difficulty in the different areas is uniform. Some areas are harder than others. In general, the deeper you get into a certain area, the harder it is to survive there. That doesn't mean the fringes of an area won't be challenging, but you can expect to have an easier time on the edge of an area than in the center of it."
The Olthoi North, for example. While at its core you may find things like Olthoi Warriors, on the fringes of the region you will find monsters better suited to a level 40 character (such as Olthoi Soldiers).
The Map is not meant to be a strict guidline of where players should hunt, it is meant as an estimate of challenge. If you want to have an easier time while hunting, drop down to the next lowest area, or hunt on the fringe of the area statted for your level."[1]
Mainland Dereth

Level 1-10 (Starter Areas)
Aluvian Regions
Sho Regions
Gharu'ndim Regions
Level 1-20 (Newbie Areas)
- River Prosper
- Isle of Tears
- Blackmire Swamp (Northwest)
Level 20-40
Level 1-20
Level 20-40
Level 40-60
Level 40-80
Level 60-80
Level 100+
Level 200+
Level 40-60
Level 60-80
Level 70-130
Level 80+
Level 150+
Level 80+
Level 100+
Level 80+
Level 100+
Level 150+
Islands of Dereth

Level 40-60
Level 60-80
Level 80+
Level 40-80
Level 80+

Level 1-20 (Starter Area)
Level 20-40
Level 40-60
Level 60-80
Level 80-100
- Isle of Ruin (Plains of Ruin)
Level 100+
- Isle of Ruin (Shattered Outlands)

Level 1-20 (Newbie Areas)
Level 20-40
Level 40-60
Level 60-80
- Tuatara Plains
- Marescent Plateau (Northeast region)
- Avalelle Island
- Ithaenc Island
- Laesvos Island
- MacNiall's Island
- Miremdae Island
- Savao Island
- Thesalene Island
- Xi Ru's Island
- Freebooter Isle
