Tlosk's Colosseum Walkthrough: Difference between revisions
imported>Tlosk |
imported>Tlosk |
||
| Line 60: | Line 60: | ||
== Rooms == | == Rooms == | ||
These instructions are for Rare runs, for alternate strategies that are more effective on coin runs or when your group isn't fully powered see [[Tlosk's Colosseum Walkthrough#Coin Run Strategies | here]]. | |||
=== #12 === | === #12 === | ||
Revision as of 14:12, 8 April 2008
This article should be considered as an appendix to the main Colosseum article. There are myriad possible strategies to beating the Colosseum, this is simply one of them.
Fellow Members
Formations
Spread
Players take up the positions of the clock
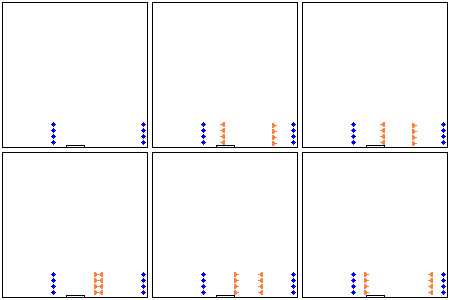
Crossfire (XFIRE)
Half your group stands in the SE corner with their backs to the eastern wall, standing shoulder to shoulder. The other half stands in a line just west of the door, also shoulder to shoulder. The reason for standing near the door instead of against the west wall is this insures that all monsters will show on everyone's radar, for selection when finishing them off with bolts. Archers should focus on killing any creatures that won't be hit by the fists. Those standing by the door will sometimes have one or more creatures get behind them, slide to the side to allow the fists coming west to hit them (and also to allow them to run past you into the crossfire area).
Ring Around the Bell
Southeast Corner (SE CNR)
There is one subvariant of this formation that is used with the Tremendous Monougas in room 18. TMs have a very long melee reach, you can use this to your advantage by putting everyone in the very corner except two archers, who stand about 6 feet apart a little ways away from the corner. This allows the tusker fists to launch and almost all of them will hit the TMs (a few may hit the posts but it's far superior to any other formation for this room). The mages can still be hit by the TMs, the purpose is not to protect them, it's to insure there is enough space between them and the monougas for the Tusker Fist spells to always launch successfully.

|
Time Saver - Have one mage bludgeon vuln all three, and a different mage vuln for cold and imperil. All other mages should start casting Tusker Fist as soon as the bell is rung. |
Rares
General Tips
Beating the spawns. Most rooms have two types of spawns, and each spawn is broken up into two parts. If you kill all of the creatures in the first part, the second part is skipped, this can save a lot of time, some rooms more than others.
Rooms
These instructions are for Rare runs, for alternate strategies that are more effective on coin runs or when your group isn't fully powered see here.
#12
#13
#14
#15
#16
#17
#18
| Spawn | 3 Tremendous Monougas | 3 Tremendous Monougas | 1 Guardian Golem | 3 Guardian Golems | 6 Guardian Golems |
|---|---|---|---|---|---|
| Weapons: | Archer: Composite Bow, Spectral Chill Arrows Melee: Cold Armor Rending Mage: Bludgeon Critical Strike |
Archer: Composite Bow, Spectral Chill Arrows Melee: Cold Armor Rending Mage: Cold Critical Strike | |||
| Notes: | On entering the room, everyone goes to the southeast corner except two archers that stand as posts (see formation). Ring the bell as soon as posts are in place, one mage does bludgeon vulns, another does imperil and cold vuln. Mages shoot Tusker Fists from corner towards the middle of the room (Northwest). Archers attack, melees can attack or replenish stamina/health/mana of mages. Almost all of your fists should hit (a few may hit a post). If misfiring the posts are too close to the corner. Although archers are preferable as posts, melees can substitute if they don't attack (never move from the post spot, can still replenish mages though). If a monouga gets past the posts they are too far apart. | Everyone goes to the north wall in the middle (so you're by the door if time is close). One mage does Imperils, one mage does Cold Vulns, rest attack. Try to attack the same one to quickly thin them out. These drop decent loot, but be sure to use the door before the time is up. | |||
In Game Directions
The following text has been optimized for space so it will all fit on a single page of parchment. If you place the parchment on a hotkey, you can then assign a key to that hotkey space to quickly access it. Also if you have a secondary character copy and paste the text onto a new parchment, you can use the 2nd parchment to copy and past text without it entering edit mode (so no need to click another area to get out of text edit mode).
Acknowledgments
These techniques were developed over many many Colosseum runs on the Harvestgain server. Contributors include (among others):
- Begley (Padain)
- Crog
- Dakmor Kavu
- Kromwell (Apocalyptic Doom)
- Laser (Paine)
- Paul Mua'dib
- Trade Mule
- Tlosk (Xithrak)
