Inventory Panel: Difference between revisions
imported>Immortalbob |
imported>Immortalbob |
(No difference)
| |
Revision as of 14:29, 4 October 2012
Related topics: User Interface
The Inventory Panel consists of the Paper Doll, the Burden Indicator, the Container Slots, and the Inventory.
Paper Doll
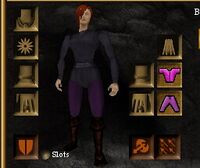
The Paper Doll is the 2D representation of your character within the panel. You use it to equip and unequip Clothing and Armor.
You can also use the doll to charge all your wielded items with mana by double clicking a Mana Stone and then clicking on the paperdoll. The same thing can also be achieved by using the charge on the 3D model or by using it on the backpack slot icon.
Equipment Slots
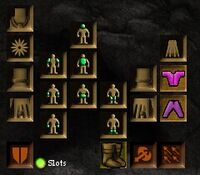
There are also several slots in (when visual slots are enabled) and around the paper doll used for equipping and unequipping items:
- Jewelry
- Armor and Clothing
- Weapon
- A primary Weapon
- Shield slot for a secondary off-hand weapon if Dual Wield is trained
- Ammunition slot
- Other:
- A Cloak
- A Trinket
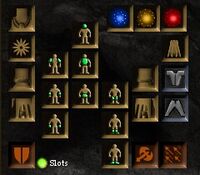
- In addition, at levels 75, 150, 225, after running the Aetheria Quest you may equip related Aetheria in new slots revealed to the right of the head of the paper doll in matching colors, Blue, Yellow, and Red.
Burden Indicator
The Burden Indicator displays your current burden percentage. For more information, see the Character Information status panel.
Container Slots
The Container Slots are where side packs are kept. The top bag is your main inventory, and below it are slots for 7 additional containers. The main inventory can hold up to 102 items. Most side packs hold 24 items, with a few special packs that can hold more. The Shadow of the Seventh Mule augmentation adds one additional side pack slot. For a list of available packs see Category:Pack.
Inventory Slots
The Inventory displays the items, in the form of icons, in the pack you currently have selected.
Inventory Management
When you open a pack in your inventory panel, that pack becomes your 'preferred' pack. If you haven't opened a pack, your main backpack is your preferred pack.
When you add an item to your inventory in one of the ways listed below, the item first tries to fit itself into your preferred pack.
If it won't fit there, it tries to fit somewhere into your entire inventory space, starting with your main pack and working down until it finds somewhere it can fit.
Stacked items will try to merge into an existing stack if they can in the same fashion. This behavior applies to most of the default ways that you can add something to your inventory, such as:
- Using the R key on something external to you that can be picked up.
- Using the F key on anything, internal or external.
- Dragging an icon of an external object onto your 3D avatar.
- Making a shortcut to an object that you do not own but can pick up.
This behavior does not apply to ways of placing an item specifically into a certain pack, such as:
- Dragging an item to a specific pack or place in a pack.
- Dragging an item onto the main backpack button at the bottom right of the UI.
You can also assign a key to the action "Move selected item to main pack". This action is very much like "Move selected item to inventory" (the F key by default), but it ignores whatever pack you have open. There is also a character option that allows you to use your main pack as your preferred pack.
Stacked items can be split using a few methods.
- Use the slider on the Selected Target Bar to select the amount of items you wish to split off a stack.
- You may also click the text box appearing on the Selected Target Bar and input the exact number you wish to split.
- Using the T key on an item will automatically highlight the text box in the Selected Target Bar, and you may edit the number without having to click on the box to access it.
Shortcut Slots
Nine numbered shortcut slots can be found at the bottom of the panel. As expected, these slots are used to quickly use objects found in any of your Packs by pressing the appropriate number on your keyboard. To create a shortcut you simply drag an item to one of the slots.
However, when in spell casting mode, you must use Ctrl+# to access your shortcuts. Just pressing the number will access the Spell Casting Panel.
Tip: As the main backpack slot (the first pack slot) is a way of selecting your character, you can create a shortcut to yourself for quickly using Healing Kits or Mana Charges. For example, if you create a shortcut to your backpack in slot 1 and then a shortcut to a healing kit in slot 2, you can heal yourself by simply pressing 2 and then 1.
Images
Click image for full size.
-
Paperdoll
-
Equipment Slots Enabled
-
Aetheria Slots
Notes
- You can now charge all your wielded items by using a mana charge on the paperdoll.
- You will now receive a warning two minutes before an item you are wielding runs out of mana.
- You can now drag your main backpack into the vendor window to sell everything in it.
- You can now hand a stack of items to an NPC instead of having to split one item off the stack first.
- Slots for character's undergarnments (pants and shirt) added to the paperdoll.
- Clothing can now be removed by dragging them from the paper doll even if they were equipped via the clothing slot.
- Changes made to inventory management. See the Release Notes for more details.
- "Move selected item to main pack" keyboard shortcut and "Use Main Pack as Default" character option added.
- Cooldown timers added to the game for use with items such as the Throne of Destiny augmentation gems.
- Items with cooldown timers now display the remaining time as a bar that shrinks on the right side of the icon (instead of being grayed out as previously done).
- New paperdoll slots for Aetheria can be opened by completing the Aetheria Quest.
- Option for turning on visual slots added below the paperdoll.
- Slot for Cloaks added to the paperdoll.


