Hidden Cavern: Difference between revisions
Jump to navigation
Jump to search
imported>Tlosk New Page |
imported>Arkalor |
||
| (22 intermediate revisions by 2 users not shown) | |||
| Line 1: | Line 1: | ||
' | {{Dungeon Summary | ||
| Patch Introduced = [[Visions in the Darkness]] | |||
| Related Quests = [[Aerbax's Prodigal Banderling]],<br>[[Hidden Cavern Quest]],<br>[[Missing Persons Investigation]] | |||
| | | Updated = [[Ancient Enemies]] | ||
| | | | ||
| Live Image = Hidden Cavern Live.jpg | |||
| | | Live Image Caption = Hidden Cavern | ||
| | | | ||
| Wiki Map File = | |||
| | | Wiki Map Two = | ||
| | | ACmaps.com ID = 5F48 | ||
| Other Map = | |||
| | | | ||
| | | Coordinates = 37.9S, 65.5W | ||
| Landblock = 5F48 | |||
| Dereth Map = {{Map Point|37.9|S|65.5|W|Marker=Dungeon}} | |||
| | | Nearest Town = [[Ayan Baqur]] | ||
|} | | Nearest LS = 48.0S, 65.2W | ||
| Route = Take the Obsidian Rim portal at either the [[Singularity Caul]] or the [[Aerlinthe]] drop, run west to 69.0W then run north to 39.0S then climb over the ridge to 37.9S 65.5W.<br>You can also use the [[Dangerous Portal Device]] from your mansion until you get VoD and then run to the cavern<br>Alternatively, the Mid-VoD portal drops next to the dungeon if you can find someone with the tie. | |||
| | |||
| Level Restrictions = 80+ | |||
| Tieable = False | |||
| Recallable = False | |||
| Summonable = False | |||
| Lifestone if Log = False | |||
| Quest Flag = None | |||
}} | |||
== General == | |||
On each side is a locked door that requires a key to open it. The [[Bone Key]] for the east side drops randomly on the banderlings. The [[Glittering Key]] for the west side drops randomly on the drudges. If you get to close to the rock piles it triggers additional spawns. | |||
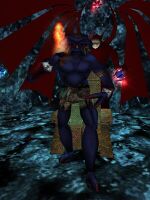
This dungeon used to contain [[Harraag, Banderling Champion]] until he was kidnapped by the Virindi and turned into the Prodigal Banderling [[Harraag]]. | |||
== Maps == | |||
* {{ACMaps.com|5F48}} | |||
== | == NPCs == | ||
* [[Harraag, Banderling Champion]] - kidnapped, Prodigal Harraag now found in [[Harraag's Lair]]. | |||
* [[Scrum, Drudge Seraph Mystic]] | |||
== | == Creatures == | ||
{|cellpadding=5 | |||
|-valign=top | |||
| | |||
{{Creature Class|Banderling | |||
| Location = Dungeon | |||
| Banderling Hierophant | |||
| Banderling Paragon | |||
| Banderling Champion | |||
}} | |||
| | |||
{{Creature Class|Drudge | |||
| Location = Dungeon | |||
| Drudge Seraph | |||
| Drudge Seraph Mystic | |||
}} | |||
|} | |||
== | == Items and Objects == | ||
* [[Banderling | * {{Icon Link|Bone Key}} - Randomly dropped by [[Banderling Champion]]s, pickup timer? | ||
* [[ | * {{Icon Link|Bone Door}} - Locked 9999 difficulty door, unlock using [[Bone Key]] | ||
* [[ | * {{Icon Link|Glittering Key}} - Randomly dropped by [[Drudge Seraph Mystic]]s, pickup timer? | ||
* {{Icon Link|Sealed Door}} - Locked 9999 difficulty door, unlock using [[Glittering Key]] | |||
* {{Icon Link|Pile of Rocks}} - Found in west part of dungeon, spawns a group of Drudges | |||
* {{Icon Link|Pile of Stones}} - Found in east part of dungeon, spawns a group of Banderlings | |||
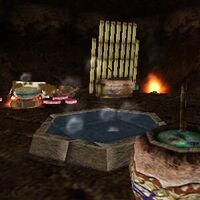
* {{Icon Link|Obsidian Shard (The Mirror)}} - Found just behind Scrum in his throne room | |||
=== | == Portals == | ||
* Surface - | |||
* | |||
== Images == | |||
Click image for full size version. | |||
<gallery heights=200px widths=200px perrow=3> | |||
File:Bone Door Live.jpg|Bone Door | |||
File:Harraag, Banderling Champion Live.jpg|Harraag, Banderling Champion | |||
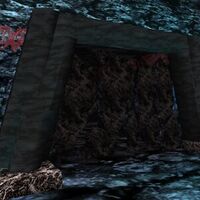
File:Harraag's Old Den Live.jpg|Where Harraag used to stand beyond the Bone Door | |||
File:Sealed Door Live.jpg|Sealed Door | |||
File:Scrum, Drudge Seraph Mystic Live.jpg|Scrum, Drudge Seraph Mystic | |||
</gallery> | |||
Latest revision as of 00:23, 13 June 2012
| Maps NPCs Creatures Items and Objects Portals Images Update History |
|
 |
| |||||||||||||||||||||||||||||||||


General
On each side is a locked door that requires a key to open it. The Bone Key for the east side drops randomly on the banderlings. The Glittering Key for the west side drops randomly on the drudges. If you get to close to the rock piles it triggers additional spawns. This dungeon used to contain Harraag, Banderling Champion until he was kidnapped by the Virindi and turned into the Prodigal Banderling Harraag.
Maps
NPCs
- Harraag, Banderling Champion - kidnapped, Prodigal Harraag now found in Harraag's Lair.
- Scrum, Drudge Seraph Mystic
Creatures
Items and Objects
 Bone Key - Randomly dropped by Banderling Champions, pickup timer?
 Bone Door - Locked 9999 difficulty door, unlock using Bone Key
 Glittering Key - Randomly dropped by Drudge Seraph Mystics, pickup timer?
 Sealed Door - Locked 9999 difficulty door, unlock using Glittering Key
 Pile of Rocks - Found in west part of dungeon, spawns a group of Drudges
 Pile of Stones - Found in east part of dungeon, spawns a group of Banderlings
 Obsidian Shard (The Mirror) - Found just behind Scrum in his throne room
Portals
- Surface -
Images
Click image for full size version.
-
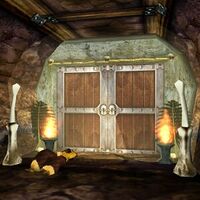 Bone Door
 -
 Harraag, Banderling Champion
 -
 Where Harraag used to stand beyond the Bone Door
 -
 Sealed Door
 -
 Scrum, Drudge Seraph Mystic


