Singularity Caul: Difference between revisions
imported>An Adventurer m Text replace - "Hunter Quest (Tenebrous Rifts)" to "Tenebrous Rift Kill Task" |
imported>Zen1605 m →Route |
||
| (39 intermediate revisions by 5 users not shown) | |||
| Line 1: | Line 1: | ||
{{Related|Geographic Areas}} | |||
{{Intro | {{Intro | ||
| Patch Introduced = [[Lost in the New Horizon]] | | Patch Introduced = [[Lost in the New Horizon]] | ||
| Line 4: | Line 5: | ||
| Updated = [[Mirror, Mirror]] | | Updated = [[Mirror, Mirror]] | ||
}} | }} | ||
{|align=right | |||
[[ | |[[File:Singularity Caul.jpg|thumb|260px|Singularity Caul]] | ||
|- | |||
== Description == | |align=center|__TOC__ | ||
|} | |||
=== Description === | |||
Caul Island is a huge, circular island to the Southwest of Dereth.<br> | Caul Island is a huge, circular island to the Southwest of Dereth.<br> | ||
It's been the center of many story arcs and events.<br> | It's been the center of many story arcs and events.<br> | ||
All over the island, different items associated with [[Bael'Zharon]] and [[Aerbax]] can be found, such as [[Virindi Spire]]s, a [[Shadow Spire]] and [[Stone Statue of Bael'Zharon]].<br> | All over the island, different items associated with [[Bael'Zharon]] and [[Aerbax]] can be found, such as [[Virindi Spire]]s, a [[Shadow Spire]] and [[Stone Statue of Bael'Zharon]].<br> | ||
Also, the island is full of all sorts of [[Empyrean Ruins]].<br><br> | Also, the island is full of all sorts of [[Empyrean Ruins]].<br><br> | ||
For a Map of Caul, with all important information, see: [[Media:caul_island.gif|here]].<br><br> | |||
Caul is a large area, there are two ridges that bisect the island, viewed from overhead it looks like an X in a circle, with a small crater area in the very middle. The spawns are fairly well separated by these ridges. For creature information see each specific area on the Caul. | |||
==== History ==== | |||
Originally, the island was accessible by invitation only. [[Bael'Zharon]] called Monarchs to run "[[The Gauntlet]]", an invitation only quest to receive an [[Shadow Stone|Atlan Shadow Stone]] and the title of [[Titles|Dark Master]]. See the text of [[Samuel, Former Guardian]].<br><br> | |||
=== History === | |||
Originally, the island was accessible by invitation only. [[Bael'Zharon]] called Monarchs to run "[[The Gauntlet]]", an invitation only quest to receive an [[Shadow Stone|Atlan Shadow Stone]] and the title of [[Titles|Dark Master]]. See the text of [[Samuel, Former Guardian]].<br> | |||
The island opened up for all players during the [[Lost in the New Horizon]] event.<br>In the [[The Rise of the New Singularity]] story arc, a group of Virindi led by [[Levistras]] chose the island as the location to build a new Singularity. <br> At that time, it became also possible to access the island by handing [[Ecorto the Lost Director]] a [[Fragment of the New Singularity]]. The exit portal from the this way accessed [[Seat of the New Singularity]] dungeon dropped you close to the dungeon for [[Caul Recall]].<br> | The island opened up for all players during the [[Lost in the New Horizon]] event.<br>In the [[The Rise of the New Singularity]] story arc, a group of Virindi led by [[Levistras]] chose the island as the location to build a new Singularity. <br> At that time, it became also possible to access the island by handing [[Ecorto the Lost Director]] a [[Fragment of the New Singularity]]. The exit portal from the this way accessed [[Seat of the New Singularity]] dungeon dropped you close to the dungeon for [[Caul Recall]].<br> | ||
After Levistras was defeated, it still remained a stronghold basis for the [[Virindi]].<br> | After Levistras was defeated, it still remained a stronghold basis for the [[Virindi]].<br><br> | ||
The island used to be a good hunting ground for mages. The thick, and fast, spawn consisted mainly of [[Tusker]]s, [[Virindi]] and [[Hollow Minion]]s.<br><br> | The island used to be a good hunting ground for mages. The thick, and fast, spawn consisted mainly of [[Tusker]]s, [[Virindi]] and [[Hollow Minion]]s.<br><br> | ||
During the [[Mirror, Mirror]] event, Caul got a huge overhaul. The events before, many smaller incidents hinted at something going on deep down under Caul.<br> | During the [[Mirror, Mirror]] event, Caul got a huge overhaul. The events before, many smaller incidents hinted at something going on deep down under Caul.<br> | ||
It turned out, [[Aerbax]] was conducting experiments, with help of the Shadow [[Ler Rhan]], and the result was a radical change.<br> | It turned out, [[Aerbax]] was conducting experiments, with help of the Shadow [[Ler Rhan]], and the result was a radical change.<br> | ||
The once Virindi dominated island now shows a strong [[Shadow]] influence.<br> | The once Virindi dominated island now shows a strong [[Shadow]] influence.<br><br> | ||
Not only did the island physically change (ridges becoming higher and more pronounced, and the plateau in the middle changed into a crater, Caulcano), but also the flora, and for all, the fauna.<br> | Not only did the island physically change (ridges becoming higher and more pronounced, and the plateau in the middle changed into a crater, Caulcano), but also the flora, and for all, the fauna.<br> | ||
The basic structure of the island was however still recognizable. Also, quite a few typical Caul landscape items, such as the Statues of [[Bael'Zharon]], reappeared.<br> | The basic structure of the island was however still recognizable. Also, quite a few typical Caul landscape items, such as the Statues of [[Bael'Zharon]], reappeared.<br> | ||
| Line 43: | Line 31: | ||
Also, some of the older dungeon got relocated (for example [[Caul Asylum]]), even to outside the island (for example, [[Aerbax's Holding]]), and new dungeons and POIs were introduced.<br> | Also, some of the older dungeon got relocated (for example [[Caul Asylum]]), even to outside the island (for example, [[Aerbax's Holding]]), and new dungeons and POIs were introduced.<br> | ||
=== Route === | |||
There are 3 ways to get to Singularity Caul:<br> | |||
First method:<br> | |||
Go into the [[Singularity Bore]] dungeon and run North (Up) to the top where there is a portal usable by those flagged to use it. | |||
* Note: it is easy to get caught up in the monsters if running straight through to the top without killing some of the spawn. The second is to have the recall spell. | |||
Second method:<br> | |||
Singularity Caul Island may also be reached using Summoning Portal Gems, pulled out of the BMR chest. ([[Antiquated Compass]], [[Desolate Seed]], [[Warrior's Emblem]], [[Burning Veil]], [[Shadow Cursed Totem]], [[Corrupted Skull]], [[Seething Skull]])<br> | |||
Third Method: | |||
<br> Complete [[Singularity Recall]] to obtain [[Recall to the Singularity Caul]]. | |||
=== | === Related [[Quests]] === | ||
* [[Caul Flagging]] | |||
== | |||
* [[Aerbax's Prodigal Shadow]] | * [[Aerbax's Prodigal Shadow]] | ||
* [[Aerbax's Prodigal Harbinger]] | * [[Aerbax's Prodigal Harbinger]] | ||
| Line 63: | Line 48: | ||
* [[Delving into Claude's Mind]] | * [[Delving into Claude's Mind]] | ||
* [[Tenebrous Rift Kill Task]] | * [[Tenebrous Rift Kill Task]] | ||
* [[ | * [[Umbral Rift Kill Task]] | ||
* [[Shield of Isin Dule Quest]] | * [[Shield of Isin Dule Quest]] | ||
* [[Sepulcher of Nightmares]] | * [[Sepulcher of Nightmares]] | ||
* [[ | * [[Splitting Grael (High)]] (101 - 150) | ||
* [[Tunnel of Love Quest]] | * [[Tunnel of Love Quest]] | ||
== [[NPCs]] == | === Geographic Areas === | ||
* [[North Singularity Caul]] | |||
* [[West Singularity Caul]] | |||
* [[East Singularity Caul]] | |||
* [[South Singularity Caul]] | |||
* [[Caulcano]] | |||
=== [[NPCs]] === | |||
{{NPC Table | {{NPC Table | ||
| Table Rows = | | Table Rows = | ||
| Line 76: | Line 68: | ||
| Location = 97.4S 94.6W | | Location = 97.4S 94.6W | ||
| Type = | | Type = | ||
| Details = [[Tenebrous Rift Kill Task]], [[ | | Details = [[Tenebrous Rift Kill Task]], [[Umbral Rift Kill Task]] | ||
}} | }} | ||
{{NPC Row | {{NPC Row | ||
| Line 92: | Line 84: | ||
}} | }} | ||
== [[Items]] == | === [[Items]] === | ||
{{Item Table|Nightmare Gate (Object)|Statue of Bael'Zharon, the Hopeslayer|Black Totem Gateway|Black Marrow Reliquary}} | {{Item Table|Caption=Dropped Items | ||
| Atakir's Blade | |||
| Mite Leg Bone | |||
| Katar of the Fallen | |||
| Spear of the Fallen | |||
| Bow of the Fallen | |||
| Dirk of the Fallen | |||
| Crossbow of the Fallen | |||
| Gikar's Dream | |||
| Plaguefang's Hide | |||
| Puppeteer's Skull | |||
| Scourge's Hide | |||
| Snarl's Hide | |||
| Scroll of Raven Fury | |||
| Sezzherei's Lair (Portal Gem) | |||
}} | |||
{{Item Table|Caption=Landscape Items | |||
| Nightmare Gate (Object) | |||
| Statue of Bael'Zharon, the Hopeslayer | |||
| Black Totem Gateway | |||
| Black Marrow Reliquary | |||
}} | |||
== [[Points of Interest]] == | === [[Points of Interest]] === | ||
{|border=0 cellpadding=3 | {|border=0 cellpadding=3 | ||
| | | | ||
| Line 169: | Line 183: | ||
* [[96.8S, 93.4W - Double Statue of Bael'Zharon]] | * [[96.8S, 93.4W - Double Statue of Bael'Zharon]] | ||
| | | | ||
* [[91.8S, 92.8W - Shadow Spire]] | |||
| | |||
* [[Stone Statue of Bael'Zharon]] - 97.9S 96.4W | |||
| | |||
* [[Stone Statue of Bael'Zharon]] - 97.9S 96.2W | |||
|- | |- | ||
| | |||
* [[Stone Statue of Bael'Zharon]] - 96.9S 96.4W | |||
| | |||
* [[Virindi Spire]] - 98.3S 96.8W | |||
| | |||
* [[Virindi Spire]] - 93.6S 98.4W | |||
| | |||
* [[Virindi Spire]] - 93.2S 99.9W | |||
|- | |||
| | |||
* [[Virindi Spire]] - 94.6S 92.6W | |||
|} | |} | ||
== [[Portal]]s == | === [[Portal]]s === | ||
* 98.0S, 94.7W - [[Obsidian Rim]] | * 98.0S, 94.7W - [[Obsidian Rim]] | ||
== [[Dungeons]] == | === [[Dungeons]] === | ||
{{Dungeon Table | {{Dungeon Table | ||
| Table Rows = | | Table Rows = | ||
| Line 228: | Line 258: | ||
}} | }} | ||
== | === Creatures === | ||
The spawns are fairly well separated by the ridges. For creature information see each specific area: | The spawns are fairly well separated by the ridges. For creature information see each specific area: | ||
* [[North Singularity Caul]] | * [[North Singularity Caul]] | ||
| Line 254: | Line 266: | ||
* [[Caulcano]] | * [[Caulcano]] | ||
==== Rare Spawns ==== | |||
{|cellpadding=5 | |||
|-valign=top | |||
| | |||
{{Creature Class|Carenzi | |||
| Snarl | |||
}} | |||
{{Creature Class|Doll | |||
| Fallen Doll | |||
}} | |||
{{Creature Class|Margul | |||
| Fallen Margul | |||
| Gikar | |||
}} | |||
| | |||
{{Creature Class|Marionette | |||
| Fallen Marionette | |||
| Puppeteer | |||
}} | |||
{{Creature Class|Mite | |||
| Colossal Mite | |||
| Fallen Mite | |||
}} | |||
{{Creature Class|Rat | |||
| Scourge | |||
}} | |||
| | |||
{{Creature Class|Reedshark | |||
| Plaguefang | |||
| | |||
}} | |||
{{Creature Class|Rift | |||
| Fallen Rift | |||
}} | |||
{{Creature Class|Shadow | |||
| Void Lord | |||
}} | |||
{{Creature Class|Zefir | |||
| Atakir, the Dark Prince | |||
}} | |||
|} | |||
=== Video === | |||
This was the way the island looked before Aerbax nuked it. <br> | |||
<youtube>0N_LYEdTAGo</youtube> | |||
=== Images === | |||
<gallery widths=200px heights=200px perrow=4> | |||
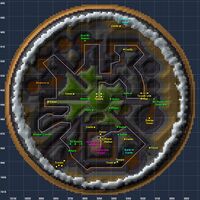
File:Caul Map.jpg|An overview of Caul | |||
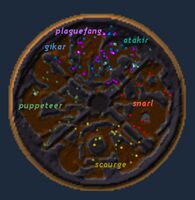
File:Caul_rares_map.jpg|Rare Spawns | |||
File:Caul Original Map.jpg|An overview of Caul back in the days | |||
File:Singularity Caul (Lost in the New Horizon) Live.jpg|How the Caul once looked | |||
</gallery> | |||
[[Category:Geographic Area]] | [[Category:Geographic Area]] | ||
Latest revision as of 18:03, 2 August 2014
Related topics: Geographic Areas
|
 |
Description
Caul Island is a huge, circular island to the Southwest of Dereth.
It's been the center of many story arcs and events.
All over the island, different items associated with Bael'Zharon and Aerbax can be found, such as Virindi Spires, a Shadow Spire and Stone Statue of Bael'Zharon.
Also, the island is full of all sorts of Empyrean Ruins.
For a Map of Caul, with all important information, see: here.
Caul is a large area, there are two ridges that bisect the island, viewed from overhead it looks like an X in a circle, with a small crater area in the very middle. The spawns are fairly well separated by these ridges. For creature information see each specific area on the Caul.
History
Originally, the island was accessible by invitation only. Bael'Zharon called Monarchs to run "The Gauntlet", an invitation only quest to receive an Atlan Shadow Stone and the title of Dark Master. See the text of Samuel, Former Guardian.
The island opened up for all players during the Lost in the New Horizon event.
In the The Rise of the New Singularity story arc, a group of Virindi led by Levistras chose the island as the location to build a new Singularity.
At that time, it became also possible to access the island by handing Ecorto the Lost Director a Fragment of the New Singularity. The exit portal from the this way accessed Seat of the New Singularity dungeon dropped you close to the dungeon for Caul Recall.
After Levistras was defeated, it still remained a stronghold basis for the Virindi.
The island used to be a good hunting ground for mages. The thick, and fast, spawn consisted mainly of Tuskers, Virindi and Hollow Minions.
During the Mirror, Mirror event, Caul got a huge overhaul. The events before, many smaller incidents hinted at something going on deep down under Caul.
It turned out, Aerbax was conducting experiments, with help of the Shadow Ler Rhan, and the result was a radical change.
The once Virindi dominated island now shows a strong Shadow influence.
Not only did the island physically change (ridges becoming higher and more pronounced, and the plateau in the middle changed into a crater, Caulcano), but also the flora, and for all, the fauna.
The basic structure of the island was however still recognizable. Also, quite a few typical Caul landscape items, such as the Statues of Bael'Zharon, reappeared.
Many new creatures appeared on the landscape, which, never very green, has gotten a basic ash colour, with strangely deformed trees.
Also, some of the older dungeon got relocated (for example Caul Asylum), even to outside the island (for example, Aerbax's Holding), and new dungeons and POIs were introduced.
Route
There are 3 ways to get to Singularity Caul:
First method:
Go into the Singularity Bore dungeon and run North (Up) to the top where there is a portal usable by those flagged to use it.
- Note: it is easy to get caught up in the monsters if running straight through to the top without killing some of the spawn. The second is to have the recall spell.
Second method:
Singularity Caul Island may also be reached using Summoning Portal Gems, pulled out of the BMR chest. (Antiquated Compass, Desolate Seed, Warrior's Emblem, Burning Veil, Shadow Cursed Totem, Corrupted Skull, Seething Skull)
Third Method:
Complete Singularity Recall to obtain Recall to the Singularity Caul.
Related Quests
- Caul Flagging
- Aerbax's Prodigal Shadow
- Aerbax's Prodigal Harbinger
- Caul Recall
- Delving into Claude's Mind
- Tenebrous Rift Kill Task
- Umbral Rift Kill Task
- Shield of Isin Dule Quest
- Sepulcher of Nightmares
- Splitting Grael (High) (101 - 150)
- Tunnel of Love Quest
Geographic Areas
| NPC Name | Location | Type | Details |
| Solange | 97.4S 94.6W | -- | Tenebrous Rift Kill Task, Umbral Rift Kill Task |
| Surloshen Realaidain | 99.6S 96.7W | -- | Tunnel of Love Quest |
| Xireri | 94.4S 96.6W | -- | Tunnel of Love Quest |
| Landscape Items | ||||||||
|
|
Nightmare Gate (Object) |
|
Statue of Bael'Zharon, the Hopeslayer |
|
Black Totem Gateway |
|
Black Marrow Reliquary | |
|
|
|
| |
|
||||
|
| |||
|
|
|
| |
|
- 98.0S, 94.7W - Obsidian Rim
| Dungeon | Coordinates | Wiki Map | ACmaps | Other | Quests |
| The Orphanage | Random Landscape Spawn | -- | 6548 | -- | -- |
| Artifex Collegium | 91.9S, 93.7W | -- | -- | -- | |
| Caul Asylum | 94.8S 91.0W | -- | 6045 | -- | -- |
| Repository | 89.3S 93.5W | -- | 0047 | -- | -- |
| Tunnel of Love | 94.4S, 96.6W | -- | -- | -- | -- |
| Nightmare Gate | 89.7S 93.9W | -- | 00F1 | -- | -- |
Creatures
The spawns are fairly well separated by the ridges. For creature information see each specific area:
Rare Spawns
Video
This was the way the island looked before Aerbax nuked it.
<youtube>0N_LYEdTAGo</youtube>
Images
-
 An overview of Caul
 -
 Rare Spawns
 -
 An overview of Caul back in the days
 -
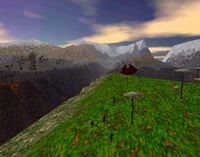 How the Caul once looked


_Live.jpg)