Sharded Shadow Armor Quest: Difference between revisions
Jump to navigation
Jump to search
imported>Arkalor |
imported>Arkalor No edit summary |
||
| Line 8: | Line 8: | ||
| Quest Type = Solo | | Quest Type = Solo | ||
| Kill Task = False | | Kill Task = False | ||
| Start Location = | | Start Location = Varies | ||
| Timer = None | | Timer = None | ||
| Level Restrictions = 50+ wield req. | | Level Restrictions = 50+ wield req. | ||
| Line 29: | Line 29: | ||
== Walk Through == | == Walk Through == | ||
To create Sharded Shadow Armor, you need a set of Greater Shadow Armor and 1 Shard for EACH PIECE of the Greater Shadow Armor | # To create Sharded Shadow Armor, you need a set of Greater Shadow Armor and 1 Shard for EACH PIECE of the Greater Shadow Armor. | ||
* Alduressa / Amuli = 2 Shards | #* Alduressa / Amuli = 2 Shards | ||
* Koujia = 3 Shards | #* Koujia = 3 Shards | ||
* Celdon = 4 Shards | #* Celdon = 4 Shards | ||
Simply click on a Shard to use it on a piece of armor. Do this once for EACH PIECE of armor. | #** Armor shards drop on [[Crystal Shard]]s and [[Sentient Fragment]]s which spawn in the north western parts of Osteth and most of the Direlands. | ||
DO NOT use the same type of shard on multiple pieces. This is NOT NEEDED, and results in doubling up of the protection spells that the sharded armor provides and is a waste of the Armor AND Shards.<br><br> | # Simply click on a Shard to use it on a piece of armor. Do this once for EACH PIECE of armor. | ||
Armor | #* DO NOT use the same type of shard on multiple pieces. This is NOT NEEDED, and results in doubling up of the protection spells that the sharded armor provides and is a waste of the Armor AND Shards.<br><br> | ||
== Items == | |||
{|cellpadding=3 cellspacing=3 text-align=left style=" border:1px solid #e5e5e5; background:#F9F9F9" | |||
|- bgcolor=#D0D0D0 | |||
!Shard | |||
!Spell | |||
!Shadow Armor Piece | |||
!Result | |||
|- | |||
| align=center|{{Icon|Brilliant Shard}} | |||
| [[Major Armor]] | |||
| align=center|{{Icon|Greater Amuli Shadow Leggings}} {{Icon|Greater Celdon Shadow Sleeves}} | |||
| align=center|{{Icon|Brilliant Amuli Leggings}} {{Icon|Brilliant Celdon Sleeves}} | |||
|- | |||
| align=center|{{Icon|Charged Shard}} | |||
| [[Major Storm Ward]] | |||
| align=center|{{Icon|Greater Koujia Shadow Leggings}} {{Icon|Greater Koujia Shadow Sleeves}} | |||
| align=center|{{Icon|Charged Koujia Leggings}} {{Icon|Charged Koujia Sleeves}} | |||
|- | |||
| align=center|{{Icon|Chilled Shard}} | |||
| [[Major Frost Ward]] | |||
| align=center|{{Icon|Greater Amuli Shadow Coat}} {{Icon|Greater Celdon Shadow Sleeves}} | |||
| align=center|{{Icon|Chilled Amuli Coat}} {{Icon|Chilled Celdon Sleeves}} | |||
|- | |||
| align=center|{{Icon|Hardened Shard}} | |||
| [[Major Piercing Ward]] | |||
| align=center|{{Icon|Greater Celdon Shadow Breastplate}} {{Icon|Greater Koujia Shadow Breastplate}} | |||
| align=center|{{Icon|Hardened Celdon Breastplace}} {{Icon|Hardened Koujia Breastplate}} | |||
|- | |||
| align=center|{{Icon|Plated Shard}} | |||
| [[Major Bludgeoning Ward]] | |||
| align=center|{{Icon|Greater Amuli Shadow Coat}} {{Icon|Greater Celdon Shadow Leggings}} | |||
| align=center|{{Icon|Plated Amuli Coat}} {{Icon|Plated Celdon Leggings}} | |||
|- | |||
| align=center|{{Icon|Scored Shard}} | |||
| [[Major Acid Ward]] | |||
| align=center|{{Icon|Greater Celdon Shadow Girth}} {{Icon|Greater Koujia Shadow Sleeves}} | |||
| align=center|{{Icon|Scored Celdon Girth}} {{Icon|Scored Koujia Sleeves}} | |||
|- | |||
| align=center|{{Icon|Seared Shard}} | |||
| [[Major Flame Ward]] | |||
| align=center|{{Icon|Greater Amuli Shadow Coat}} {{Icon|Greater Koujia Shadow Leggings}} | |||
| align=center|{{Icon|Seared Amuli Coat}} {{Icon|Seared Koujia Leggings}} | |||
|- | |||
| align=center|{{Icon|Solid Shard}} | |||
| [[Major Slashing Ward]] | |||
| align=center|{{Icon|Greater Amuli Shadow Leggings}} {{Icon|Greater Celdon Shadow Breastplate}} | |||
| align=center|{{Icon|Solid Amuli Leggings}} {{Icon|Solid Celdon Breastplace}} | |||
|} | |||
== Sharded Shadow Dye == | == Sharded Shadow Dye == | ||
| Line 45: | Line 95: | ||
| Vial of Hennacin Dye | | Vial of Hennacin Dye | ||
| Violet Armor Paint | | Violet Armor Paint | ||
| Blue Armor Paint | |||
| Red Armor Paint | |||
| | |||
| | |||
}} | }} | ||
| Line 83: | Line 107: | ||
== Notes == | == Notes == | ||
* During the [[Mirror, Mirror]] event, this quest was upgraded to allow you to dye Sharded Shadow Armor. | * During the [[Mirror, Mirror]] event, this quest was upgraded to allow you to dye Sharded Shadow Armor. | ||
Revision as of 19:08, 14 November 2009
| Walk Through ___ Items ___ Images ___ Notes |
| |||||||||||||||||||||||||||||||||||||||
General
- You must already have completed the Shadow Armor Quest in order to create Sharded Shadow Armor.
Walk Through
- To create Sharded Shadow Armor, you need a set of Greater Shadow Armor and 1 Shard for EACH PIECE of the Greater Shadow Armor.
- Alduressa / Amuli = 2 Shards
- Koujia = 3 Shards
- Celdon = 4 Shards
- Armor shards drop on Crystal Shards and Sentient Fragments which spawn in the north western parts of Osteth and most of the Direlands.
- Simply click on a Shard to use it on a piece of armor. Do this once for EACH PIECE of armor.
- DO NOT use the same type of shard on multiple pieces. This is NOT NEEDED, and results in doubling up of the protection spells that the sharded armor provides and is a waste of the Armor AND Shards.
- DO NOT use the same type of shard on multiple pieces. This is NOT NEEDED, and results in doubling up of the protection spells that the sharded armor provides and is a waste of the Armor AND Shards.
Items
Sharded Shadow Dye
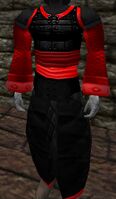
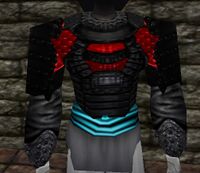
To dye Sharded Shadow Armor, visit Miko Li, Jojii Adherent at 83.3S, 47.2E in Kara. Hand her the appropriate vial for the color of dye you want:
| Vial of Relanim Dye | Vial of Lapyan Dye | Vial of Hennacin Dye | ||||
| Violet Armor Paint | Blue Armor Paint | Red Armor Paint |
Images
Notes
- During the Mirror, Mirror event, this quest was upgraded to allow you to dye Sharded Shadow Armor.

