Gaerlan's Citadel
Related topics: 2002/09 - Gaerlan's Defeat (Live Event)
| Walk Through ___ Maps ___ Items ___ XP ___ Titles ___ Images ___ Lore & Dialog ___ |
| |||||||||||||||||||||||||||||||||||||||
 | |||||||||||||||||||||||||||||||||||||||
Quest Overview
Enter Gaerlan's Citadel and help to defeat him.
This is a classic quest from the early years of Asheron's Call. It features a lot of lore and was accompanied by many related live events. 11 years after its release, a higher difficulty version (level 150+) of the quest was introduced during the Seeds of Hope event.
This quest features several regular dungeons, puzzle dungeons, and a challenging boss. It tends to be buggy when interacting with the various NPCs, so it is recommended to line up and complete all NPC interactions one at a time in order to avoid someone not getting an item/flagged/etc.
There are 5 different difficulty levels for this quest, although due to level restrictions on portals, it is not typical that any but the 150+ version are completed regularly. The item rewards for this quest use an interesting rotational mechanic. Based on the skills your character has trained and specialized, you will receive a specific item. Completing the quest numerous times gives additional different items based on your skills, with the sequence of items starting over once you have gotten them all once. In this way, the rewards are customized for each player.
Walk Through
A Note About Return Portals: Prior to starting the quest, it is good to make sure everyone knows there are a pair of bunkers in Eastham (at approximately 17.1N, 63.0E) that contain many portals related to this quest. They were added for the purpose of getting back into the appropriate sections in case of death or loss of connection. Portals exist for the Ziggurats, Proving Grounds and the Citadel Library. If you die or lose connection, you can use the Eastham portal in the Town Network and run to the bunkers for easy re-entry. Each player is flagged for each portal when you enter that dungeon during the quest. This flagging lasts until the quest is completed by each player and does not have an expiration timer.
Part 1: Guardian Lair
- Enter to the Guardian Lair appropriate to your level range. Note that the portals for each are in completely different locations.
- For level 20-39, use the Frost Guardian Lair at 52.8N, 62.4E.
- Route: Take the Sennon Valley Retreat portal at 32.9N, 59.4E from Arwic.
- For level 40-59, use the Fire Guardian Lair at 73.5N, 3.2W.
- Route: Take the Anadil portal at 66.3N, 14.3E from Crater Village.
- For level 60-79, use the Acid Guardian Lair at 30.5S, 74.3W.
- Route: Give sake to the Drunken Madman outside of Baishi at 53.1S, 61.0E and take the portal he summons. Alternately, use Mount Lethe Recall or have someone tie to the Sclavus Cathedral portal 33.4S, 80.1W.
- For level 80-149, use the Lightning Guardian Lair at 86.7S, 10.4E.
- Route: Take the Artifice Cottages portal at 32.9N, 59.4E from Arwic.
- For level 150+ use the Prismatic Guardian Lair at 10.9N 81.2W.
- Route: Run from the Northwest Direlands portal from the Aerlinthe drop. Alternately, have someone tie to the Black Spawn Den in the northern Dires.
- For level 20-39, use the Frost Guardian Lair at 52.8N, 62.4E.
- In the dungeon, work your way to the bottom where you'll find a boss golem for your level range. The dungeon itself is not very large.
- Kill the boss golem and take the portal that spawns at the top of the ramp to be portaled outside to Citadel Valley.
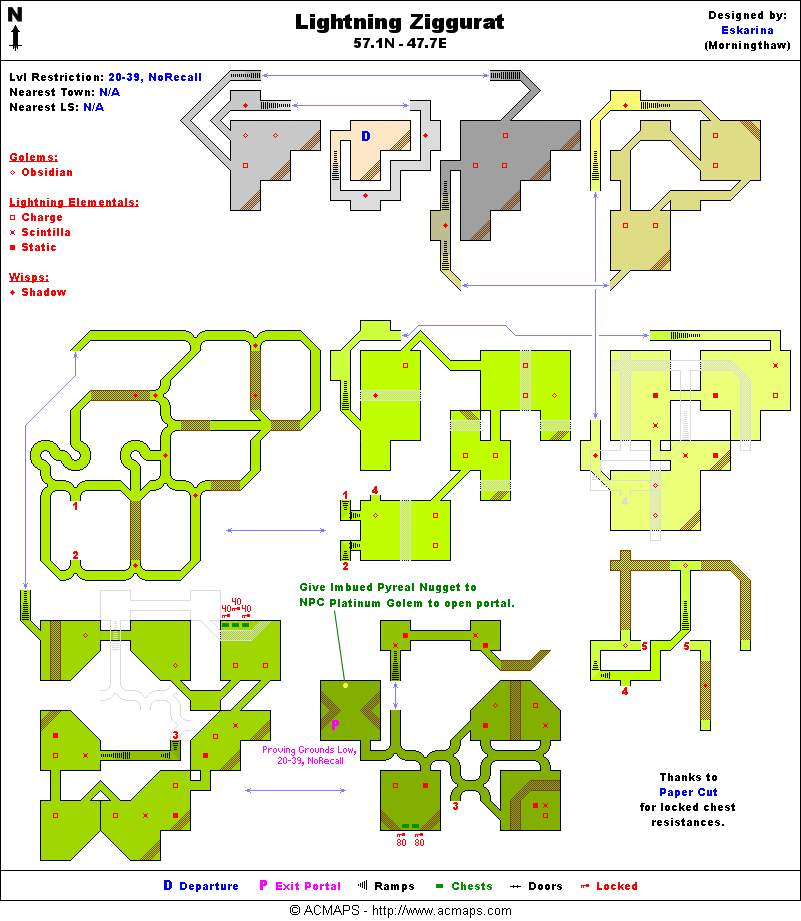
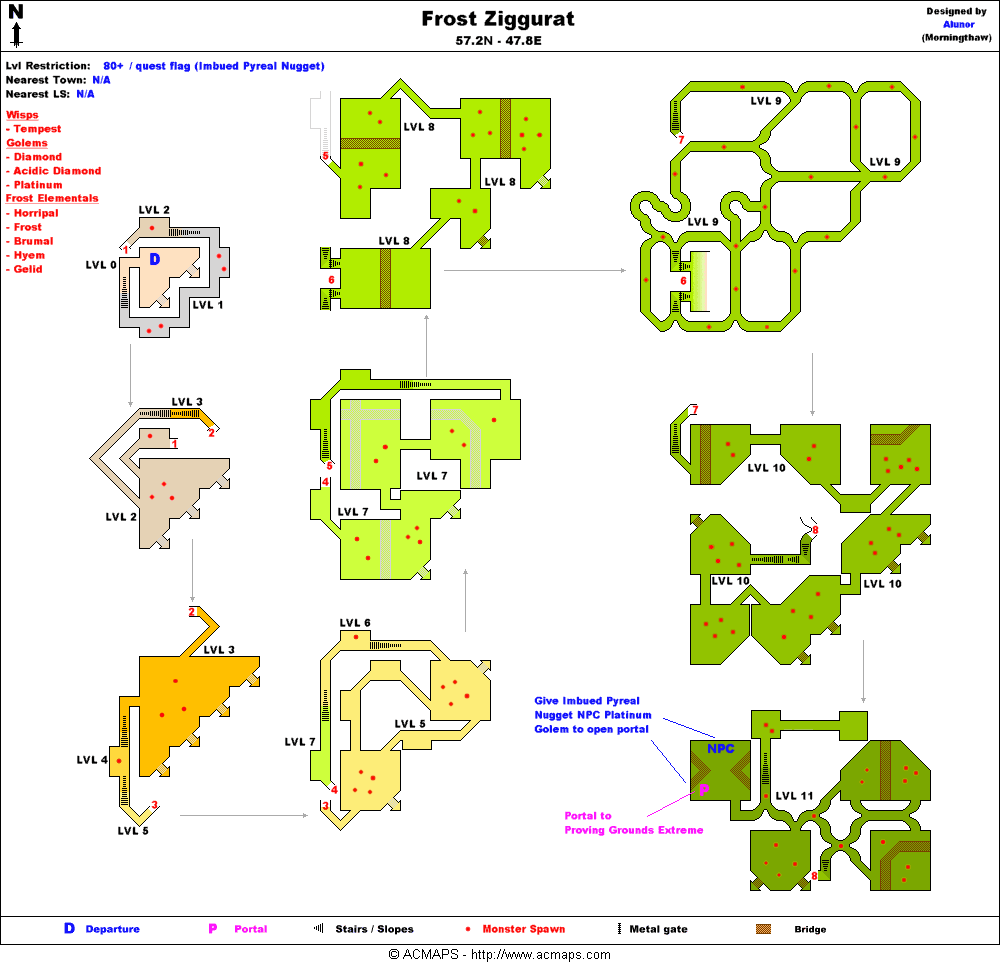
Part 2: Ziggurat
- Jump down off the cliff and run southeast to 57.8N, 48.4E, where you'll find Asheron's Platinum Golem.
- Line up and speak with Asheron's Platinum Golem one at a time and you'll receive an Imbued Pyreal Nugget.
- From here, run southwest and enter the Ziggurat portal near 57.1N, 47.8E that matches your level range. They are color coordinated for the level ranges.
- 20-39 is the Lightning Ziggurat. 40-59 is the Acid Ziggurat. 60-79 is the Fire Ziggurat. 80-149 is the Frost Ziggurat. 150+ is the Prismatic Ziggurat.
- Note: From this point onward, you may use the Ziggurat portal appropriate for your level range in the bunkers south of Eastham.
- This dungeon is the longest one on the quest and has many rooms connected in a maze-like pattern.
- Work your way through this dungeon, always going up, until you reach a Platinum Golem (NPC).
- Note: For the 150+ version, the greatest danger in this dungeon are the Frost Wisp enemies. They cast level 8 vulns and war magic. Without good protection against cold, you can easily be killed in 1-2 hits when vulned. Use caution and dispel vulns if possible.
- Hand the Platinum Golem (NPC) your Imbued Pyreal Nugget, and then enter the Proving Grounds portal located next to him.
- Note: From this point onward, you may use the Proving Grounds portal appropriate for your level range in the bunkers in Eastham.
Part 3: Proving Grounds
Inside the proving grounds, you must tackle a series of trials:
Trial #1: The Riddle
- Speak with the Tribunal located in the center of the room, and you'll be given a riddle.
- To answer the riddle, use the statue that corresponds with the right answer. If correct, you'll receive a blue Seal Fragment and be portaled to the Rolling Balls of Death.
| Question | Answer |
|---|---|
| I've legs, and a foot, and also a head. But I cannot think nor move on my own. What am I? | Bed |
| I am void, and absence, I am not a color. What am I? | Black |
| The maker want it not, the buyer does not use it, and the user never sees it. What am I? | Coffin |
| No sound, no voice, no breath,no sleep, no thought, no sight, no more. What is it? | Death |
| It begins eternity, ends time and space, it rests at the start of every end and the end of every place. What is it? | E |
| I never grow, but can become very wide, and everything falls into darkness when I hide. What am I? | Eyes |
| I can be an old love, but mostly a lost passion. My life grows as you feed me, but when I drink water I die. | Flame |
| What is it that has one voice but becomes four-footed, two-footed, and three-footed? | Man |
| I am a room without walls, windows or doors. What am I? | Mushroom |
| A poor man has too much of me, a wealthy man needs me not, and if you feast upon me you will die. What am I ? | Nothing |
| What has no beginning or end, yet binds two together? | Ring |
| You will break me if you name me. What am I? | Silence |
| At night they come without being called, but at dawn they are lost without being stolen. What are they? | Stars |
| I pass through the water and never get wet. What am I? | Sunshine |
| It waits for none and gauges all, it is eaten by leisure and work the same, it is abundant but there never seems to be enough. What is it? | Time |
| It never was, is always to be, none have seen it, but many dream of it, it is the hope of all that live that it shall always come. What is it? | Tomorrow |
| It cannot be slain so long as there is a ray, it is inspires the heart to wish for the best, yet exercise caution to not lose this gift for then you shall just be forlorn. What is it? | Hope |
| I whip, and I whistle all the day long, sometimes my voice can sound as a song. I never grow tired but sometimes grow weak, and I change without warning and cause door to creak. What am I? | Wind |
Trial #2: Rolling Balls of Death
- Take a moment to identify the pattern, and when ready, move through the dungeon, only stopping at the safe spots (alcove corners) until you reach the last alcove.
- Note: The only safe spots to stand inside this dungeon are on the 45 degree angles that are the corners of the alcoves.
- Once you get to the last safe spot before the long hallway, you'll see a door. Use missile weapons to destroy the door and then run into the room on the far side.
- After the door has been destroyed, carefully make your way to the end of the room and loot an orange Seal Fragment from the Chest on the South wall, and then use the Proving Grounds portal on the North wall.
Trial #3: Floor Puzzle
The floor puzzle contains a series of tiles that contain a hidden path to the other side. If you step on a wrong tile you'll fall through and be forced to start over.
- Navigate your way through the Floor Puzzle:
- From the left side of the room, walk on to the Fire tile to start.
- Move North 3 spaces to the 3rd Frost tile.
- Move East 4 spaces to Fire tile.
- Move North 1 space to the Frost tile.
- Move East 2 spaces to the Acid tile.
- Move North 2 spaces to the Frost tile.
- Move West 1 space to the Acid tile.
- Move North and exit the puzzle.
- Enter the room to the North and loot a green Seal Fragment from the Chest on the East wall, and then use the Proving Grounds Extreme portal on the Northwest corner.
Trial #4: Reverence of the Ceremony
The key to this riddle is to NOT TALK in open chat. If you do, you'll have to start over and fight your way through a series of golems. This includes spellcasting and anything that your character says openly. Fellow chat and global channels are still fine.
- Reverence must be shown during a ceremony. (Note that sometimes this is bugged; nothing happens some trips when you speak out loud.)
- Without speaking, run through the linear dungeon and loot a purple Seal Fragment from the chest at the end of the hall, then use the Citadel Valley portal to complete the Trials.
Part 4: Citadel Library
- Combine the the blue and orange Seal Fragments to create a Combined Seal Fragment.
 +
+  =
= 
- Combine the green and purple Seal Fragments to create another Combined Seal Fragment.
 +
+  =
= 
- Combine the 2 Combined Seal Fragments to create an Ornate Seal.
- + =

- The larger fragments fit together to create an Ornate Seal.
- Return to Asheron's Platinum Golem at 57.8N, 48.4E and hand him your Ornate Seal to receive an Imbued Ornate Seal and a Citadel Portal Gem.
- Use the Citadel Portal Gem to be portaled to the Citadel Surface.
- Hand your Imbued Ornate Seal to any Ornate Pillar on the structure to be portaled to the Citadel Library:
- Ornate Pillar teleports you with Citadel Library.
- Note: From this point onward, and until you finish the quest, you may use the Citadel Library portal in the bunkers in Eastham.
- From the drop, use the East facing staircase just to your front left and take it all the way to the platform at the top of the dungeon.
- At the top, take the portal at the very top to be portaled to final part of the quest.
- 20-39 will use Icy Demise, 40-59 will use Fiery Consumption, 60-79 will use Entropic Decay, and 80+ will use Electric Destruction.
Part 5: Gaerlan
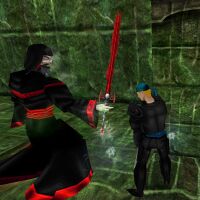
- From the drop, follow the linear dungeon until you reach a catwalk, from which you can see Gaerlan himself in the room below.
- Fully debuff and fester Gaerlan, and then kill him with Pierce or Slash weapons.
- Tip: A common strategy is have melee players form a melee wall on the catwalk, and then drag him up to the catwalk. This way mages and archers can attack from a safe distance.
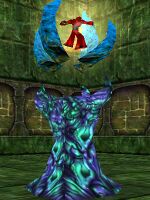
- Once Gaerlan is dead and vanishes, quickly take the portal to Gaerlan's Inner Sanctum that spawns in the room under the catwalk.
- <Player Name> has defeated Gaerlan's electric aspect. As the illusion crumbles away a deep voice thunders over the world, "A doomed eternity to relive this life. Stasis within the walls of a crystalline prison. How could I have fallen to you vermin. Nuhmudira, my revenge upon you shall be as painful as yours upon me."
- From the drop head up the ramp to the South, take your first 2 lefts, and then your first right.
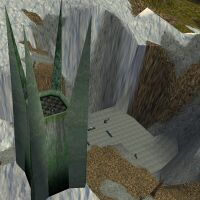
- At the T intersection, take either direction and run until you reach a pit of acid or fire. Jump down into the room with Gaerlan's Phylacteric Prison.
- Use the Gaerlan's Phylacteric Prison to receive an Elemental Master Robe, Iasparailaun, and an additional unique reward (see below).
- Note: The unique rewards are distributed based on what skills you have trained or above. The item you get will go in order from the most skill credits to train the skill down to the least, then restart. (For War, and its 4 staves, this means you must do 3 full rotations of your skills and do the quest 1 more time for the fourth.)
- [OPTIONAL] Take the Citadel Apex portal on the South wall and loot Martine's Mask and Martine's Robe.
- [OPTIONAL] Turn in your Iasparailaun to an Agent of the Arcanum for 2 MM notes, XP, and a Gaerlan Token, which can be handed back for the title of Gaerlan Slayer:
- [OPTIONAL] Turn in your Modified Iasparailaun to an Agent of the Arcanum for 5 MMD notes, XP (95mill at level 147), and a Gaerlan Token, which can be handed back for the title of Gaerlan Slayer:
- From this day forward <Player Name> shall be known as Gaerlan Slayer.
Maps
| Dungeon | Coordinates | Wiki Map | ACmaps | Other | Quests |
| Lightning Ziggurat | -- | -- | 5746 | -- | -- |
| Frost Ziggurat | -- | -- | 5A46 | -- | -- |
| Gaerlan's Inner Sanctum | -- | -- | 5654 | -- | -- |
| Proving Grounds Extreme | -- | -- | 5744 | -- | -- |
Items
150+ Gaerlan Weapons;
| Uber Weapons; (Created by adding a Weapon Upgrade Kit to a Modified Gaerlan weapon.) | ||||||||
|
|
Uber Dauloi |
|
Uber Falauloi |
|
Uber Gauraloi |
|
Uber Habraeloi | |
|
|
Uber Lautaloi |
|
Uber Palauloi |
|
Uber Raudaloi |
|
Uber Sacraloi | |
|
|
Uber Shauraloi | |||||||
| Texts; | ||||||||
|
|
Charged Tome |
|
Decrepit Tome |
|
Disciples of Corrosion |
|
Disciples of Stasis | |
|
|
Disciples of Strife |
|
Disciples of Tempest |
|
Ebuillant Tome |
|
Fiery Tome | |
|
|
Gaerlan's Research Notes |
|
Icy Tome |
|
Leather Bound Tome | |||
Experience Rewards
| Task Required | Max Experience | Percentage & Level Cap | |||
| Use Gaerlan's Phylacteric Prison (150+) | 370,000,000xp |
30% up to level 120 | |||
|
| |||||
| Give Iasparailaun to an Agent of the Arcanum | 3,000,000xp |
100% up to level 40 | |||
|
| |||||
| Give Iasparailaun to an Agent of the Arcanum | 20,000,000xp |
60% up to level 80 | |||
|
| |||||
| Give Iasparailaun to an Agent of the Arcanum (80+) | 22,000,000xp |
Fixed XP | |||
|
| |||||
| Give Modified Iasparailaun to an Agent of the Arcanum (80+) | 90,000,000xp |
Fixed XP | |||
|
| |||||
| Give Modified Iasparailaun to an Agent of the Arcanum (150+) | 100,000,000xp |
Fixed XP | |||
|
| |||||
| See Level Costs for per level information. | |||||
Title Rewards
| Task Required | Title Reward |
| Hand in Gaerlan Token | Gaerlan Slayer |
|
| |
| See Titles for a list of all available titles. | |
Images
Click image for full size version.
-
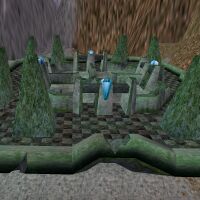
 Lightning Guardian Lair
 -
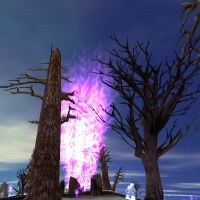
 Gaerlan's Citadel from a Distance
 -
 Rolling Balls of Death
 -
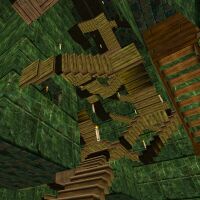 Citadel Library Staircase
 -
 Battling Gaerlan
 -
 The Citadel Apex
 -
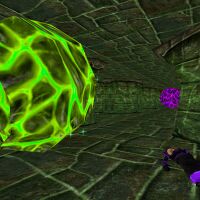
 Gaerlan's Phylacteric Prison
.jpg)
.jpg)
.jpg)
.jpg)
.jpg)
.jpg)

Lore & Dialog
Asheron's Platinum Golem tells you, "Though lord Asheron does not condone the horror wrought upon him, I have been placed here to assist those that would strike down the undead form of Gaerlan."
Asheron's Platinum Golem tells you, "Where once he meant to control the world and destroy my lord Asheron, now he suffers for eternity, now he has been given over unwillingly to the carrion call of the undead by Nuhmudira."
Asheron's Platinum Golem tells you, "Enter and activate the Platinum golems so they may hold the citadel open for you as you progress. You will need this to awaken my brethren within. When they are awake you shall be asked to past the tests that all must face to pass deeper into the citadel."
Asheron's Platinum Golem gives you Imbued Pyreal Nugget.
Asheron's Platinum Golem tells you, "The portals into the citadel's inverted ziggurat lay nearby. Complete this task and the magic within the pyreal will allow Asheron's voice to enter you. I will speak to you more once this is accomplished."
You give Platinum Golem Imbued Pyreal Nugget.
Platinum Golem says, "I hear and obey Lord Asheron Realadain."
Asheron's voice fills your mind, "You have done well. Now you must pass a set of trials that the citadel itself will place before you. In a sense it lives, as this was the design of the Empyrean from before my years. You must not fail. Failure can lead to death. I will ensure that portals are created to assist you should you meet with misadventure."
You give Asheron's Platinum Golem Ornate Seal.
Asheron's Platinum Golem tells you, "This was constructed by the most ancient of the Empyrean people."
Asheron's Platinum Golem tells you, "I have been given gems that will portal you onto the citadel. There you should find entrance into the library. They will appear as pillars of a bygone era. Give this seal to the pillars. Once done, you should be transported into the lowest level of the sanctum, located in the tower."
Asheron's Platinum Golem tells you, "Lord Asheron wishes you well on your endeavor."
Asheron's Platinum Golem gives you Imbued Ornate Seal.
Asheron's Platinum Golem gives you Citadel Portal Gem.
<Player Name> has defeated Gaerlan's electric aspect. As the illusion crumbles away a deep voice thunders over the world, "A doomed eternity to relive this life. Stasis within the walls of a crystalline prison. How could I have fallen to you vermin. Nuhmudira, my revenge upon you shall be as painful as yours upon me."
Gaerlan's Phylacteric Prison gives you Modified Elemental Master Robe.
Gaerlan's Phylacteric Prison gives you Modified Iasparailaun.
You've earned 350,000,000 experience.
You've earned 15,000 Luminance.
Gaerlan's Phylacteric Prison gives you Modified Saulandoi..
A woman's voice sounds in your mind, "You have not yet earned the right to draw what you will from his soul. Return when you have waited a full cycle of the days. Greed is a poor attribute to have, child.
You allow Agent of the Arcanum to examine your Modified Iasparailaun.
You hand over 1 of your Modified Iasparailauns.
Agent of the Arcanum tells you, "I see that you have visited revenge upon the man that wanted to bring our race to an end. Nuhmudira thanks you for this. Here is your reward."
You've earned 100,000,000 experience.
Agent of the Arcanum gives you 5 Trade Notes (250,000).
Agent of the Arcanum gives you Gaerlan Token.
Agent of the Arcanum tells you, "I see that you have visited revenge upon the man that wanted to bring our race to an end. Nuhmudira thanks you for this. Here is your reward."
From this day forward, <Player Name> shall be known as Gaerlan Slayer.."
Notes
- During the A Perfect Paradox event, the Once Per Character quest timers were removed from Martine's Robe and Martine's Mask thus making them repeatable.
- During the Discoveries event, the xp reward when handing in the Iasparailaun was increased.
- During the Pillars Made of Sand event, a level 126+ xp reward for handing in the sword was introduced.
- During the Secrets of the Apostates event, the xp rewards when defeating Gaerlan and using his Phylacteric Prison were updated.
- During the Reforging the Past event, the xp reward for handing in the Iasparailaun was updated again.
- During the Master of Arms event all the Gaerlan weapons had their stats and wield requirements updated.
- During the Seeds of Hope event a +150 version of this Quest was introduced.
- During the A Growing Twilight event the folowing changes were made to Modified Gaerlan weapons;
- Modified Gaerlan weapons can now be upgraded using Weapon Upgrade Kits.
- Modified Gaerlan weapons now accept Left-hand Tether Remover.
- Uber Gaerlan weapons were added to the game.
- During the The Quest for Freedom event, the xp reward was slightly increased by 20,000,000 for the Uber (180+) version. The maximum amount of XP is now 470,000,000.