Lady Aerfalle Quest
| Walk Through ___ Maps ___ Items ___ XP ___ Images ___ Lore & Dialog ___ Notes |
| |||||||||||||||||||||||||||||||||||||||
 | |||||||||||||||||||||||||||||||||||||||
Quest Overview
This quest requires lockpick to complete.
The Lady Aerfalle Quest is the major quest associated with Aerlinthe Isle. In order to reach the final dungeon, an extensive set up is required. This is often done by one player (who has lockpick) and then the rest of the group joins before heading to the final dungeon. There are 3 difficulty versions of the quest. Only 9 keys are dropped by Lady Aerfalle, so only 9 people can get rewards per run. The uber version of the quest has an additional dungeon and is limited to a locked fellowship of level 150+ players.
This quest has ties to the Sword of Lost Light Quest, Atlan and Isparian upgrades, and Menhir Research. These portions of the quest are optional.
There is a dispel trap inside of Aerfalle Keep which can dispel all buffs. It is possible to avoid the trap using a jump. If your group contains players who cannot yet fully buff themselves, be aware that you will need someone to rebuff them if they fail to avoid the trap.
One of the largest and oldest quests in the game, the Lady Aerfalle Quest is a true classic and is considered by many to be one of the greatest quests in the history of Asheron's Call.
Walk Through
Part 1: Preparation
These steps can be done alone or with a smaller group, there are no rewards and participation is not essential for being a part of the later sections of this quest.
- Go to the Crater Caves Dungeon at 66.7N 12.5E. At the bottom of the dungeon near the forges, collect the Pyreal Forge Bellows laying on the ground.
- Route: See Crater Lake Village for route. Many portal bots often have a portal tie to Crater.
- Travel to Aerlinthe Isle.
- If you have done the quest before, use Aerlinthe Recall, otherwise you can get there by handing a D Note to Garaena the Emissary at 87.6S, 65.6W, just east of Candeth Keep. Alternatively, you can hand a C Note to Faladha the Emissary, an undead NPC located inside Chalicmere Castle.
- From the Aerlinthe drop, follow the inner harbor beach around to the harbor's northwest corner (87.7N 44.4E). Go due west up the slope to 88.0N 43.4E then follow the ledge that wraps around the mountain to the north and enter the Tenkarrdun Foundry at 88.8N 42.8E.
- Retrieve the Sluice Gate Bar from the Foundry. Lockpick is required.
- Note: See map for location of the Sluice Gate Bar. You will need to unlock one door and pull a lever to open one door to reach it. The lever door does not stay open for long, so be quick!
- Tip: The dungeon has several exit portals which drop at different locations. One portal in particular drops at 88.6N 42.4E, near your next destination. This portal is at the very bottom of the dungeon, so you will need to backtrack after getting the bar and pull 2 levers to open the doors to the bottom of the dungeon (see map for details). Alternatively, you can take any exit portal and make a longer run to the next location.
- Run to the Aerlinthe Reservoir at 85.5N 43.4E.
- Enter the dungeon and proceed down to the bottom.
- If you are planning/considering doing the easy version of the quest, you must pick up one Sacrificial Dagger in this dungeon. It is behind a locked door just before you get to the large downward sloping room (see map for details). Only one dagger is needed per run. Note that the dagger is Attuned and Bonded, so whoever loots the dagger must also go on the rest of the quest.
- At the bottom of the reservoir behind a locked door (322) is a portal to the Aerlinthe Lower Reservoir, use this portal.
- Run to the bottom of the Lower Reservoir and hand the Sluice Gate Bar to the Repair Golem. The golem appears as an NPC (white dot on the radar). Giving the bar to the golem officially starts the quest and causes the Smithing Golem to spawn in the Tenkarrdun Foundry.
- Tip: There is an important jump near the end, when you come to a shaft facing west. There is a small grate you need to hit or you'll fall to the very bottom of the shaft and there is no way back except running back to the dungeon from Aerlinthe drop. To hit the grate, jump normally towards the SW corner of the shaft, you'll slide down the corner and hit the grate.
- Note: If the golem is NOT there, it means the quest is in progress, or someone has killed the watchman within the last 3 hours. You are able to log out in the dungeon, so if the Repair Golem is not there, you can log out and then finish the preparation after he has respawned.
- After giving the bar to the Repair Golem, jump through the left wall opening to get to the exit portal.
- Run back to the Tenkarrdun Foundry and head all the way to the bottom of the dungeon. You will need to pull 2 levers and unlock 2 doors to get there. The lever doors do not stay open for long, so be quick!
- At the very bottom, give the Pyreal Forge Bellows to the Smithing Golem. This causes the Tenkarrdun Hellfire to spawn in the crater on Aerlinthe. It also causes a lava animation to happen near the Smithing Golem.
- At this point, the entire group should meet up to continue the quest. If desired, use one of the exit portals in the dungeon and then run back to the Aerlinthe drop.
Part 2: Infusions and Relic Town
- Gather your group and get everyone to Aerlinthe. Run around the harbor and then up the hill to enter the crater to the north.
- Kill the Tenkarrdun Hellfire located in the crater near 90.3N 46.3E. Killing this Hellfire causes the Relic Watchman to spawn in Relic Town (an undead town on Aerlinthe). It also causes the Mount Esper Firestorm to spawn.
- [OPTIONAL] Sword of Lost Light upgrades: If you are getting the Sword of Lost Light upgrades, loot a Red Fire Infusion from the corpse of the Tenkarrdun Hellfire (drops 9). If you are doing just the upgrades and not completing the rest of the Lady Aerfalle quest, you can then proceed directly to Crater Lake Village where the Mount Esper Firestorm has spawned. Otherwise, this can be done after completing the Lady Aerfalle quest.
- Note that if you are not completing the rest of the Lady Aerfalle Quest, it is good practice to proceed to Relic Town and kill the Relic Watchman anyway, so the quest will properly reset for the next group.
- Head to Crater Lake Village and then go to the middle of the lake and kill the Mount Esper Firestorm. Loot a White Fire Infusion (drops 9). Killing the firestorm causes the Mount Lethe Hellfire to spawn.
- Head to Mount Lethe in the Direlands and kill the Mount Lethe Hellfire. Loot a Blue Fire Infusion (drops 9).
- See Sword of Lost Light Quest for details on using the infusions and further upgrades.
- [OPTIONAL] Sword of Lost Light upgrades: If you are getting the Sword of Lost Light upgrades, loot a Red Fire Infusion from the corpse of the Tenkarrdun Hellfire (drops 9). If you are doing just the upgrades and not completing the rest of the Lady Aerfalle quest, you can then proceed directly to Crater Lake Village where the Mount Esper Firestorm has spawned. Otherwise, this can be done after completing the Lady Aerfalle quest.
- [OPTIONAL] Near the Tenkarrdun Hellfire is a Behemoth of Tenkarrdun at 90.0N 46.3E. When killed, the Behemoth drops 9 Black Boulders. These can be given to a Stone Collector for a Black Fire Atlan Stone, which can be used to upgrade an Atlan or Isparian Weapon with a Major Stone in it. Note that the Enhanced Black Fire Atlan Stone is part of the reward for the Uber version of the quest. You need both the Black Fire and the Enhanced Black Fire stones to fully upgrade an Atlan/Isparian weapon.
- After killing the Hellfire, head south again to the bay, and follow the path around the bay to the west. Eventually you will come to Relic Town.
- In Relic Town it is important to ensure all of your group is present before killing the Relic Watchman. Groups often gather on top of the buildings to avoid the many enemies. It is safest to not kill enemies to avoid the risk of killing the Watchman by mistake.
- Occasionally it can take a few minutes after killing the Hellfire for the Watchman to spawn.
- When everyone is ready, kill the Relic Watchman and take the portal to Aerfalle Keep which opens at 86.4N 45.4E. The portal only stays open for a few minutes, so use it quickly!
Part 3: Aerlinthe Keep and Lady Aerfalle
- Once inside Aerfalle Keep, you have 90 minutes to complete the quest. Lockpick is required.
- Directly ahead from the drop is a door. Behind the door is a short hallway and another door. Within the hallway is a dispel trap. Use a small jump just inside the first door to avoid it! Anyone who misses the jump will likely need to rebuff.
- If doing the easy version of the quest, hand the Sacrificial Dagger to the Ghost of Dylaeral (see map for details). This causes the easiest boss to spawn.
- If doing the hard version of the quest, nothing special needs to be done before proceeding to the end.
- If doing the uber version of the quest, go to the chest rewards room and get a Nexus-keyed Mana Shard from the altar. Then backtrack and give it to the Ghost of Galaeral. This locks your fellowship and causes the portal to Aerfalle's Sanctum to spawn.
- Proceed through the Keep using lockpick and levers to open doors (see map for details). All versions of the quest go to the same room where either a boss or a portal is waiting.
Easy Version
- Kill Aerfalle's Weakened Apprentice and loot an Ashen Key (drops 9).
- Backtrack to the lever room with the Infernos and use the key on Lady of Aerlinthe's Chest.
- Loot all the rewards from the chest (loot will pile up if you don't loot it all).
Hard Version
- Kill Lady Aerfalle's Apprentice and loot an Ornate Ashen Key (drops 9).
- Backtrack to the lever room with the Infernos and use the key on Lady of Aerlinthe's Ornate Chest.
- Loot all the rewards from the chest (loot will pile up if you don't loot it all).
Uber Version
- In the final room there will be a portal to Aerfalle's Sanctum. You must click on the portal to use it.
- Aerfalle's Sanctum is a "no log" dungeon, so if you log out or disconnect you will be sent to your lifestone and will be unable to rejoin the quest.
- The enemies in this dungeon are considerably more difficult than the enemies up to this point. Proceed slowly and with caution! There are some rooms which have traps that cause more enemies to spawn. Beware of these and continue moving forward to avoid getting hung up.
- Proceed through the dungeon, going down whenever possible until you reach a ledge that overlooks Lady Aerfalle.
- There are several strategies for fighting Lady Aerfalle. If your group is mostly missile weapon and mage characters, it can be safest to simply kill her from the ledge above. Otherwise you can fight her in the throne room below or move into the hallway behind the throne for more protection.
- Lady Aerfalle has high health and defense, and casts many debuffs. She can also counter-vuln and dispel vulns on herself, so it is generally best to use rended weapons.
- Kill Lady Aerfalle and loot an Embossed Ashen Key (drops 9), and Lady Aerfalle's Charm (drops 9) from her corpse.
- [OPTIONAL] Behind the throne is a Menhir ring which is used for part of the Menhir Research quest. The vortex causes massive damage, so be quick if using it.
- Take the hallway behind the throne and hand Lady Aerfalle's Charm to the Ghost of Galaeral for luminance rewards.
- Note: Ghost of Galaeral despawns after 5 min so be sure to turn in right away.
- Use the Embossed Ashen Key to loot the chest behind the Ghost of Galaeral.
Part 4: Rewards
- Give whichever Token you looted to Kuyiza bint Zayi the Translator in Zaikhal for an experience reward (and Strengthened Mana Forge Key for Uber version).
- Give the Unreadable Scroll to Kuyiza bint Zayi the Translator as well and she will teach you Aerlinthe Recall (level 6 item spell).
- [OPTIONAL] The Ashbane sword can be given to Leikotha for an additional small experience reward if desired.
- The staff and the robe cannot be turned in for any sort of rewards. They can be kept or given to a Town Crier.
Maps
| Dungeon | Coordinates | Wiki Map | ACmaps | Other | Quests |
| Crater Caves Dungeon | -- | -- | 019A | -- | -- |
| Tenkarrdun Foundry | -- | -- | 0116 | -- | -- |
| Aerlinthe Reservoir | -- | -- | 02EE | -- | -- |
| Aerlinthe Lower Reservoir | -- | -- | 02ED | -- | -- |
| Aerfalle Keep | -- | -- | 01F5 | -- | -- |
| Aerfalle's Sanctum | -- | -- | -- | -- |
Items
| Easy Rewards | ||||||||
|
|
Aerfalle's Token |
|
Unreadable Scroll |
|
Aerfalle's Pallium |
|
Staff of Aerfalle | |
|
|
Ashbane | |||||||
| Hard Rewards | ||||||||
|
|
Aerfalle's Ornate Token |
|
Unreadable Scroll |
|
Aerfalle's Supreme Pallium |
|
War Staff of Aerfalle | |
|
|
Superior Ashbane | |||||||
| Uber Rewards | ||||||||
|
|
Aerfalle's Embossed Token |
|
Unreadable Scroll |
|
Aerfalle's Mana-infused Pallium |
|
Mana-infused Acid War Staff of Aerfalle | |
|
|
Reforged Ashbane |
|
Enhanced Black Fire Atlan Stone | |||||
| Side Rewards | ||||||||
|
|
Red Fire Infusion |
|
Blue Fire Infusion |
|
White Fire Infusion |
|
Black Fire Atlan Stone | |
|
|
Ring of the Watchman | |||||||
| Untranslated Texts | ||||||||
|
|
Charred Book |
|
Sheets of Paper (Aerfalle) |
|
Singed Note | |||
| Translated Texts | ||||||||
|
|
Aerfalle's Letter |
|
Aerlinthe Record |
|
Smith's Note | |||
Experience Rewards
| Task Required | Max Experience | Percentage & Level Cap | |||
| Turn in Ashbane to Leikotha | 13,765,337xp |
20% up to level 100 | |||
|
| |||||
| Turn in Superior Ashbane to Leikotha | 13,765,337xp |
20% up to level 100 | |||
|
| |||||
| Turn in Reforged Ashbane to Leikotha | 50,000,000xp |
??% up to level ?? | |||
|
| |||||
| Turn in Aerfalle's Token to Kuyiza bint Zayi the Translator | 15,000,000xp |
??% up to level ?? | |||
|
| |||||
| Turn in Aerfalle's Ornate Token to Kuyiza bint Zayi the Translator | 55,000,000xp |
??% up to level ?? | |||
|
| |||||
| Turn in Aerfalle's Embossed Token to Kuyiza bint Zayi the Translator | 160,000,000xp |
??% up to level ?? | |||
|
| |||||
| See Level Costs for per level information. | |||||
Images
-
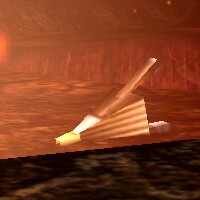 The Pyreal Forge Bellows on the ground in Crater Caves Dungeon.
 -
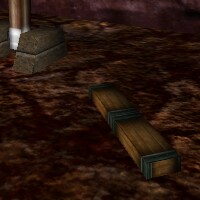 The Sluice Gate Bar on the ground in Tenkarrdun Foundry.
 -
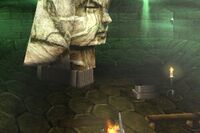
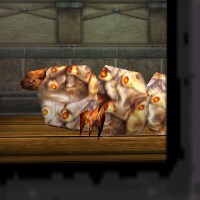 One of the experiments being conducted in Aerfalle Keep on an Olthoi Larva.
 -
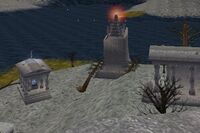 Relic Town on the inside Harbor of Aerlinthe.
 -
 Final chamber in Aerfalle Keep where Lady spawns.
 -
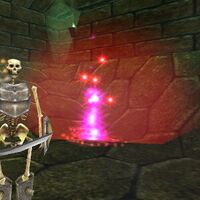 Portal opens in Lady room when shard is given to Galaeral.


Lore & Dialog
You give Repair Golem Sluice Gate Bar.
The golem turns and fuses the bar into the Sluice Gate. Somewhere below, you feel a grinding vibration through the ground... The fires of Tenkarrdun have been redirected to the ancient Yalaini forges.
You give Smithing Golem Pyreal Forge Bellows.
The golem, obeying ancient directives, turns and ignites the forges. Far below you, a tremor runs through the earth. The decayed machinery groans, shivers, and grinds quickly to a halt. Mount Tenkarrdun has become active again!
Your attack stops Tenkarrdun Hellfire cold!
As <Player> smites the Hellfire, the flame-creatures sigh, and begin to disappear back into the vents and fumaroles they surfaced through. But, from the base of the mountain's slopes, you hear the whisper of falling ash, and the clacking of petrified bones...
You flatten Relic Watchman's body with the force of your assault!
Just before <Player> scatters the petrified bones across the ash of the port, it attempts to cast a portal to retreat! The ancient port of Aerlinthe is peaceful again... or at least as peaceful as it ever gets. But now the party has only ninety minutes to find and destroy the Lady of Aerlinthe!
Ghost of Galaeral tells you, "The songs of my sisters echo across eternity and I am left to rot; bound through the arts of ill-wind taught by sisters who had fallen to the call of the twisted dark. Thousands of years bound against my will to a tether not of my making, bereft of power and ability to purchase a final release, I have waited and watched within the walls of this prison."
Ghost of Galaeral tells you, "The skein of her life now draws taut as she is stirred to action, re-exerting her command over these halls and drawing on the lives of those she once imprisoned. Through the countless years, most that were bound here against their will have become lost and slipped into madness, the echo of their lives now scattered dust and formless agony. Not I."
Ghost of Galaeral tells you, "I recall the device, the tool used to pull the blood of my heart into a vessel that held my precious vitae long enough to rip free my soul and lock it within the walls of this keep, evermore a servant to her will. But my years of servitude draw near an end, and through the voices of elder sisters who sang to the deep and refused to sell our secrets to the Dericost, I am given a moment of clarity to find my freedom. Yet the walls ever remain my prison."
Ghost of Galaeral tells you, "Aerfalle has changed. She has grown her flesh anew and taken the glamour of her youth. But all this imagery is false. She risks more power at the cost of those bound in these halls. My fallen sisters seek not redemption, but through their folly they will give me mine. Aerfalle's strength lies in tunnels long crushed by the weight of time, halls within this keep that you cannot traverse, halls which I can still travel."
Ghost of Galaeral tells you, "But I cannot lessen her strength without an instrument of sacrifice. The blade that drew my heart's blood must be used to stab at her crusted heart and weaken her strength."
Ghost of Galaeral tells you, "Bring me the dagger and I shall take my revenge and aid you in her destruction."
You give Ghost of Galaeral Sacrificial Dagger.
A haunting voice echoes in the halls of the Keep. "Light is not lost on this world yet. I shall enact my part of this bargain, outlander. Seek vengeance for the countless years, the suffering and the agony of those she has destroyed. Blessings of Ithaenc go with you."
You bring Lady Aerfalle to a fiery end!
On far Aerlinthe Island, an intrepid band has found the lair of the Dark Lady Aerfalle, at whose whim the earth itself does shake. But the bold <Player> has driven her back into her hidden crypts, and the ground stills... until she next awakens.
The withered corpse of Aerfalle hisses in rage as it is hewn in twain... "I shall not be sent to a final rest by primitives like thee, <Player>!" her severed head says from the stones. "Enjoy this insignificant victory, child. For I have walked this world for over ten millennia, and I shall walk it long hence your little race has returned to the dust that birthed thee!"
You give Bretself the Translator Charred Book.
Bretself the Translator tells you, "Well, this may be of use in our researches. This is a sort of record or timeline, detailing the major events in the history of the Aerlinthe port and island."
Bretself the Translator gives you Aerlinthe Record.
In your mind, a soft voice sighs, "Disturb me not... Travel past this hole in the earth."
You give Leikotha Ashbane.
Leikotha releases a dry, rasping gasp.
Leikotha tells you, "Ashbane... mine own sword."
Leikotha examines her sword, feeling the weight of the blade in her hands.
Leikotha tells you, "I had dropped this on the hill of Ayn Tayan... My rage had so blinded me. Ferah, had played me for the fool..."
Leikotha tells you, "Spinning lies in my mind..."
Leikotha tells you, "What I did..."
A sound slowly builds within Leikotha, until finally an unearthly scream emanates from her. You feel the din about to deafen you when the scream stops.
Leikotha tells you, "Why... why..."
Leikotha stares silently at the blade of the sword.
Leikotha tells you, "How... where... ai, thy mind tells me that thou has found in one of Aerfalle's caches. Foul magus that she is. I shall reward thee for thy efforts."
You've earned 8,861,536 experience. (Level 89)
You give Kuyiza bint Zayi the Translator Aerfalle's Token.
Kuyiza bint Zayi squints as she reads the inscription on the token.
Kuyiza bint Zayi the Translator tells you, "This seems to be an inscription from Rytheran to Aerfalle, promising his undying love."
Kuyiza bint Zayi the Translator snickers.
Kuyiza bint Zayi the Translator tells you, "Undying love indeed..."
Kuyiza bint Zayi the Translator tells you, "I know people who would be interested in this. Please, allow me to reward you for bringing this to me."
You've earned 15,000,000 experience.
You give Kuyiza bint Zayi the Translator Aerfalle's Ornate Token.
You've earned 55,000,000 experience.
Kuyiza bint Zayi squints as she reads the inscription on the token.
Kuyiza bint Zayi the Translator tells you, "This seems to be an inscription from Rytheran to Aerfalle, promising his undying love."
Kuyiza bint Zayi the Translator snickers.
Kuyiza bint Zayi the Translator tells you, "Undying love indeed..."
Kuyiza bint Zayi the Translator tells you, "I know people who would be interested in this. Please, allow me to reward you for bringing this to me."
You give Kuyiza bint Zayi the Translator Aerfalle's Embossed Token.
Kuyiza bint Zayi squints as she reads the inscription on the token.
Kuyiza bint Zayi the Translator tells you, "This seems to be an inscription from Rytheran to Aerfalle, promising his undying love."
Kuyiza bint Zayi the Translator snickers.
Kuyiza bint Zayi the Translator tells you, "Undying love indeed..."
Kuyiza bint Zayi the Translator tells you, "I know people who would be interested in this. Please, allow me to reward you for bringing this to me."
You've earned 132,499,992 experience.
Kuyiza bint Zayi the Translator gives you Strengthened Mana Forge Key.
You give Ghost of Galaeral Lady Aerfalle's Charm.
Ghost of Galaeral tells you, "I see you have defeated the cruel Lady and thus achieved retribution for those she has destroyed. A deed of such high measure must be rewarded."
You've earned 15,000 Luminance.
Notes
- During The Risen Princess event the uber version of the quest now has an Enhanced Black Fire Atlan Stone in the rewards chest at the end.
- During the Hollow Victory event, Aerfalle's Pallium and Ashbane were moved to Lady of Aerlinthe's Chest.
- During the Hidden Vein event, many changes were made to the quest. See Upcoming Changes to Aerlinthe for details.
- During the From the Darkness Born, the hard version of Lady Aerfalle was introduced along with the new quest mechanic to alternate between the easy version and the new version.
- During the Foolish Ambition event, the XP rewards were adjusted.
- During the Old Ghosts event, the uber version of Lady Aerfalle was introduced and the recall scroll is now available on all three versions of the quest.
- In an unknown event, the easy and hard versions of Lady Aerfalle were replaced with two versions of Lady Aerfalle's Apprentice. The global changed slightly to reflect this.